The IT Assets Database was replaced by the IT Admins CMDB and is EOL / End of Life, no further development will be done on this project.
Before you update
You want to backup the SQL database and the folder with the current database version as your very first step so you are able to revert back!
Please be aware – the update will wipe out your SysColumns table and reset it to default. If you changed anything in this table to adjust the searches and listboxes, you will need to do this again.
Further will there be some adjustments to certain records in some system tables (tblDatabaseStatus, tblDeploymentStatus, tblProjectsDisposition, tblPurchaseItemStatus, tblPurchaseStatus). If you did not make changes directly in those tables (not possible via the regular application) you might need to review them.
SysConfig changes
The SysConfig table will get a few more configuration values, namely:
Version 3.0 to Version 3.5
- Localization – Currency
- Localization – Language
- Main – IncludeLoanderWkst
- ProjectTasks – MailDefaultSender
- ProjectTasks – MailRecipient
Version 2.0 to Version 3.0
- Application – DropBoxAutoDropDown
- Application – Version
- Employees – NewEmployeeScript
- Employees – NewEmployeeScriptAlternateUserName
- Employees – NewEmployeeScriptAlternateUserOption
- Employees – NewEmployeeScriptAlternateUserPrefix
- Employees – NewEmployeeScriptAlternateUserSuffix
- Incidents – RootPath
- LDAPGroups – NewLDAPGroupScript
- LDAPGroups – NewLDAPGroupScriptAlternateUserName
- LDAPGroups – NewLDAPGroupScriptAlternateUserOption
- LDAPGroups – NewLDAPGroupScriptAlternateUserPrefix
- LDAPGroups – NewLDAPGroupScriptAlternateUserSuffix
- Main – CertificatesWarning
- SNMPGet – AutoSyncInternval
- SNMPGet – Path
- SNMPGet – TimeOut
Version 1.0 to Version 2.0
- Application – ErrorLimit
- Checklists – Script_AlternateUsername
- Checklists – Script_AlternateUserOption
- Checklists – Script_AlternateUserPreffix
- Checklists – Script_AlternateUserSuffix
- HistoryReport – email_lastsend
- HistoryReport – email_recipient
- HistoryReport – email_schedule
- HistoryReport – email_sender
- HistoryReport – email_subject
- Main – WorkstationsReplaceInDays
- Workstations – ReplaceOnAddMonths
Please refer to the SysConfig section of the manual for more details about them.
Downloads
SQL updates
You need to update SQL in a step by step process, depending on which version you are, until you are on the latest version – but only if you have a older version of the database installed. If you start from scratch, the download holds already the newest version.
The SQL update process described below is the same for each of the SQL schema updates. Repeat it with each update you apply.
In order to determine which version you are running, compare the differences / new features of release 2.0 with what you have. If you have version 3.0 you see the version information directly in the front end.
- Please download the script here to update from version 3.0 to version 3.5 (use the contact form to request for now)
- Please download the script here to update from version 2.0 to version 3.0 (if you downloaded between 12/26/2018 and 5/3/2019) => Version 3.0 shows the version number in the main menu – from this point on it will be easy to determine the current version
- Please download the script here to update from version 1.0 to version 2.0 (if you downloaded prior to 12/26/2018)
- Note: Those downloads are disabled as of November 2019 – please use the contact form to get the update files.
The Front End Microsoft Access database
Additionally go to the Download section to download the newest version of the front end application as well – the update script above is solely for the SQL database!
The update process
Once you downloaded both files, please first create a backup of your current Microsoft Access front end application – you simply can rename the two files “IT_Assets_Program.accdb” and “IT_Assets_Program_DEV.accdb” to something else or copy them somewhere else as a backup.
Now open the new IT Assets Database zip file and extract the same two files from the ZIP file to your program source directory – DO NOT YET OPEN THE PROGRAM!
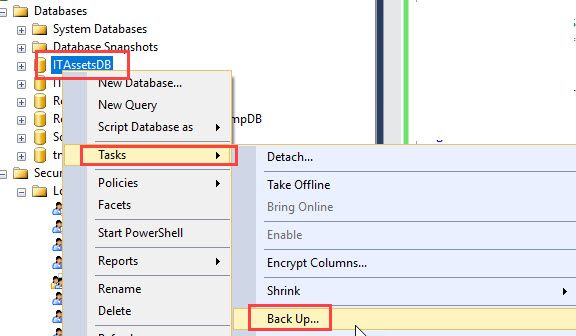
Backup your SQL database first
Open your SQL Server Management Studio and create a backup of your database while right clicking on your database and selecting Back up… under Tasks in the context menu.
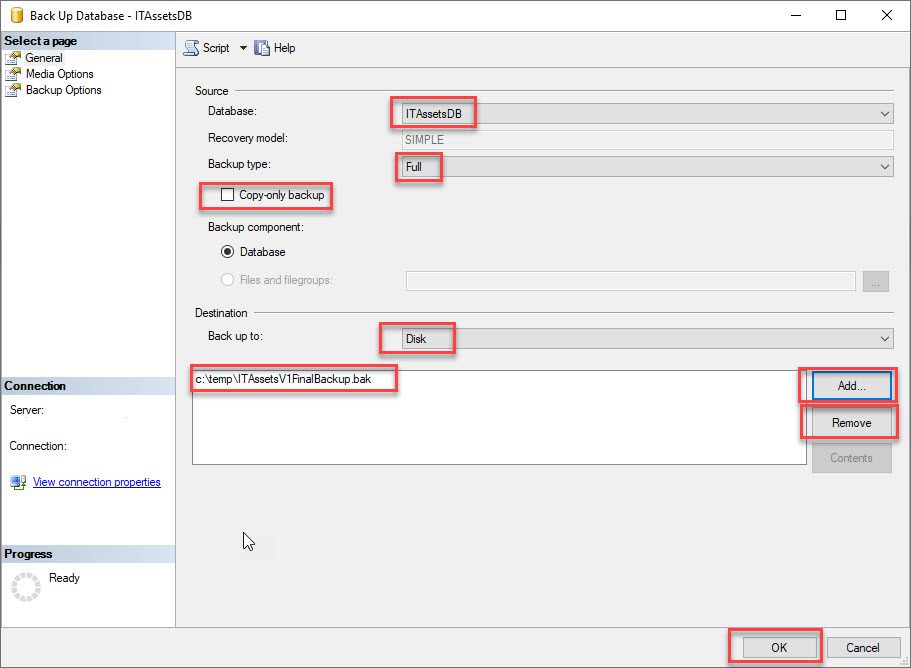
Remove any existing backup destinations and add a new backup destination – naming the file ITAssetsV1FinalBackup.bak via the ADD button. Make sure you select the right database and backup type full.
Apply the schema updates in SQL
Now open the file SchemaUpdate.sql from the ITAssetsDBv1-to-v2-SchemaUpdate.zip (respective ITAssetsDBv2-to-v3-SchemaUpdate.zip respect ITAssetsDB_SQL-Update_3.0_to_3.5.sql) via SSMS (SQL Server Management Studio). Click anywhere in to the script window to make it active and make sure you have the right database selected in the upper left toolbar menu.
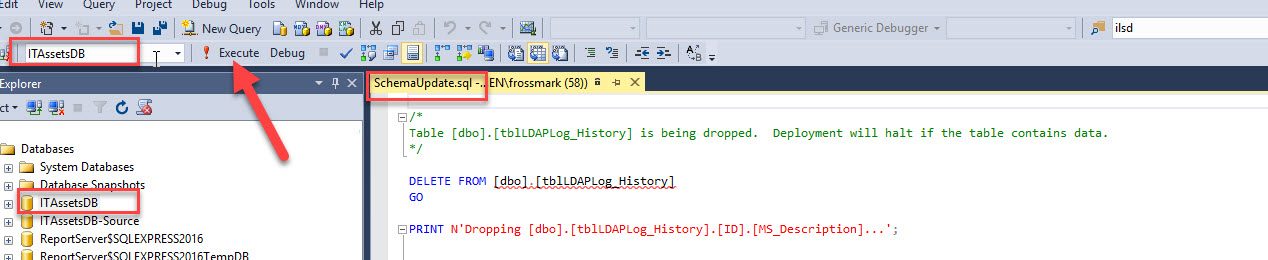
After you open the script and selected the right database, click on EXECUTE in the toolbar (as indicated in the picture with an arrow) to execute the update script. This will take about a minute or more, depending on the size of your database. Once the script is finished you will see a output log in the message tab, scroll all the way to the bottom – you should not see any errors there.
Open the new front-end Access Database file
If this all finished correct – you can now open the IT_Assets_Program.accdb directly in the program folder. Since this is the first start of the new front end, it will ask you again for connection information to the database, like described in the Installation section of the manual. Simply inform the program about the SQL connection information, it should not create a new user nor should you need to change anything else in this setup assistant. It will reconnect the front end to the database.
Next please go to the Users menu and give yourself the rights you might miss – so you see the new sections in the program. Close the program and open it as usual (like you did before) – you will see some new buttons and menus.
Please note – if the SQL script failed you might want to gather some information of what failed and use the contact form to let me know what did go wrong. I will do my best to resolve the issues. Meanwhile you probably want to restore the previously created backup of your database.
Assign User Rights
As a final step make sure your user has sufficient rights. This includes especially any newly added modules/rights. Just go to the users module and make sure the modules you want to use are activated.