The configuration is rather straight forward and divided in to three main parts:
Please note that the configuration page is only available to users that are member of the ADMINISTRATORS group of the server where the IIS is running. If the user opening the link is not a member of this group only the search providers page will be available.
Named Tags
 Tags are used within the Search Targets table. If you do not name the used tags in the following table, the TAG it self will be shown within the Search Providers. Administrators can see a indicator in the Search Provider overview and see if there are any unnamed tags.
Naming tags allows not only to give them pretty names, it allows further to make them only available to members of certain Active Directory Groups. A named tag can have one or more groups assigned that the user has to be a member of in order to see the Search Provider.
- tag
- the tag used in the Search Targets table
- display name
- the display name of the tag / search provider, this will also be used in Windows Explorer
- be aware that some symbols are automatically translated/replaced by Windows Explorer with a underline “_”
- description
- a description shown to the user in the overview that details information about this search provider
- AD group name
- one or more Active Directory Group names, use a comma “,” to separate them
If you have named tags that aren’t used in the Search Targets table, nothing will happen. You can leave em or remove em. Only used tags will be processed and shown to the end user.
Application configuration settings
 This section is divided in to two parts, a table with some settings and the ability to upload a logo that will be shown in the upper right of the web site.
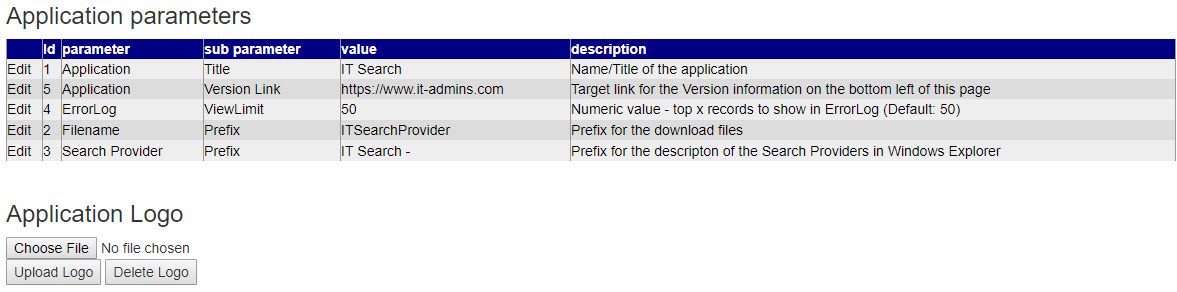
Application settings
Please have a look at the following table. It shows you the default settings and the explanation of the values. You can only adjust the values, not the parameter or sub-parameter settings nor the description. It should be pretty self-explanatory.
| Application | Title | IT Search | Name/Title of the application |
| Application | Version Link | https://www.it-admins.com | Target link for the Version information on the bottom left of this page |
| ErrorLog | ViewLimit | 50 | Numeric value – top x records to show in ErrorLog (Default: 50) |
| Filename | Prefix | ITSearchProvider | Prefix for the download files |
| Search Provider | Prefix | IT Search – | Prefix for the description of the Search Providers in Windows Explorer |
| Monitoring | Validation Interval | 1440 | An interval in minutes. This will be used by the monitoring and statics page. |
Logo
![]()
![]() As for the logo upload, this is rather simple – you can chose your own logo file (has to be JPEG image) and simply upload it. The file needs to be less then 1 MB, what should be plenty for a small logo. Once you upload it, you will see it in the upper right section, the authenticated user name will move a bit left and the logo will be to the right of it. If you want to delete it, simply click on the delete button and the logo will disappear.
As for the logo upload, this is rather simple – you can chose your own logo file (has to be JPEG image) and simply upload it. The file needs to be less then 1 MB, what should be plenty for a small logo. Once you upload it, you will see it in the upper right section, the authenticated user name will move a bit left and the logo will be to the right of it. If you want to delete it, simply click on the delete button and the logo will disappear.
The sole purpose behind this feature is to give you the chance to give the web page a more corporate look and feel to the end users, assuming your are going to provide them the link to the web site and not just the search provider files or roll them out per GPO.
Search Targets
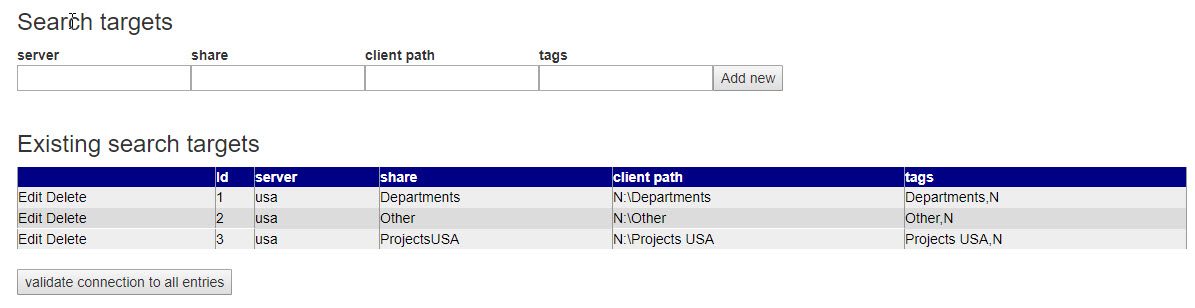 In this section you need to enter all the namespace shares on the primary target server closest to the IT Search web application server. Optimal would be that those are in the same IP-scope (file server and IIS server) to make sure maximum speed as from a network design point of view is guaranteed.
Security needs and explanation
The user running the application pool on the IIS for the IT Search web application needs to have READ access to all those shares on the share level as well as on the NTFS level – including all folders and files. Add the user either to the appropriate groups or give him somehow else those minimum permissions. Those are needed in order for Windows Search Index to reply with results within the network share. Those are then again checked for their actual NTFS ACLs and only when the requesting end user has access to the file reported back to him.
Why is this necessary? As from a security point of view I did not like this either. IIS respective ASP.NET can do something called impersonation and execute certain actions in the context of the authenticated Windows user. Unfortunately this does not work when a third server / target is involved. The file server in the end is this third server and getting the configuration for the ASP.NET / IIS application to a point where this is truly passed through is quite a hassle. There are many factors that could mess this up. I personally would have loved to do so, but I bumped in to various issues with it. It would have been nice since the Windows Search already would do the ACL check and only report back what the user would be able to access. Due to the huge effort to get this working I eventually decided to go the lesser part of resistance, even thought it meant I had to check every result my self for ACL permissions before I report it back to the user.
On the sunny side – this allowed me to implement a GOD MODE search provider that simply does not check for any ACL permissions and does a quick dump scan against any file within the whole configured server/share structure. This came in very handy especially when e.g. auditors are on site and requested certain information that the company needed to provide asap. So there is a good side to it as well.
If you are concerned about security, the tool will only do very simply operations – namely check if the file folder is accessible with the application pool user and then retrieve the NTFS ACLs and process it. Windows Search Index of course needs to provide the file-path first. Due to that, you could theoretically narrow down the necessary permissions to something like list files in folder and read permissions.
Adding search targets
Having said all of this – and I think it was important before we talk about adding targets that you know all of it – lets talk about adding target. This is rather simple, you add the server name (only the host name, not a FQDN / DNS suffix), the name of the share for the namespace on the file server, a translated client path and a tag.
In detail – some examples can be found on the how it works page as well:
- server
- host name only – do not add a DNS suffix
- share
- the share name on the host for the DFS namespace target
- you can add sub-paths as you want, e.g.: share$\departments\IT
- you can use %username% within the entered string, it will be replaced with the username (no domain) of the user requesting data from this share
- client path
- this is the path the end user would see – like N:\Departments\IT
- tags
- you can enter one or more tags in order to group the share to a search provider, use a comma “,” to separate the tags
- if you leave this blank, only GOD MODE will be able to search in this share
Validating the search targets
It is quite a hassle to enter all search targets in a complex structure and make sure they are all correct and up to date. In order to make life a bit easier, I added a validation feature to this section.
It will simply check all targets you defined for their server name (no DNS suffix), accessibility (typo’s etc.) and if there are files and folders that are in the share as well as if the Windows Search Index database is accessible on the server-share combination.
Simply click on validate connection to all entries and wait till you see the results. If there are any red lines in the results, you might have an issue and need to correct it.
Errors in the validation will be pointed out in red while warnings are orange and successful messages are shown in blue.
Automatic validation and monitoring
Please note that the monitoring and statistics page will cause an automatic validation as well.