Under the File menu you will find Settings where you can adjust the application settings and configuration.
General
 General
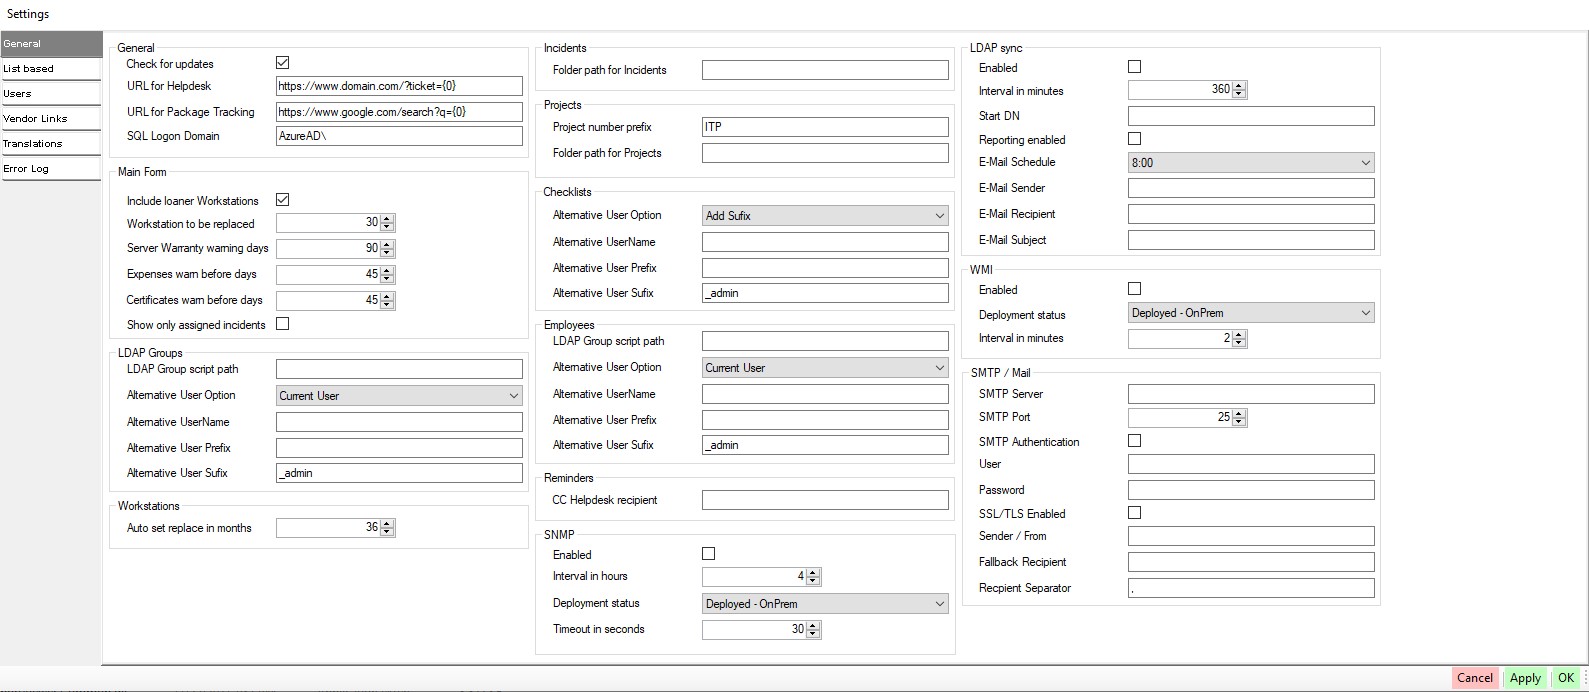
- Check for updates
- If checked the application will automatically check online if there are any updates available. Uncheck to disable this. You still can use the check for updates function in the File menu.
- Proxy
- This applies to the Update check only currently. If you need to pass through a proxy to reach the Internet, please provide the URL including the Proxy-Port.
- URL for Helpdesk
- You can put internal Helpdesk Ticket numbers throughout the application. If you put an URL here, the system will insert this number where the {0} is specified and make an open button available.
- URL for Package Tracking
- Similar to the Helpdesk URL, the system will insert any Tracking number for package tracking where the {0} is placed.
- SQL Logon Domain
- This is automatically set when you start the application for the first time on an empty database. You should not need to alter this, unless you change your internal domain name. Otherwise, do not change this setting as it will not let make changes to the application anymore.
- Check for updates
- Main Form
- Include loaner Workstations
- If checked, the expiring Workstations list will also include loaner devices. This allows to remove them from this list on Main, as those devices are often older devices that won’t be replaced with brand new ones.
- Workstations to be replaced
- Relative days before the replace on setting in Workstations to display them on the Main screen.
- Server Warranty warning days
- This impacts Server / Infrastructure and Other Assets as those are based on the same table. Relative days before the warranty expires in order to include them on the Main screen.
- Expenses warn before days
- Upcoming Expenses – include them on the Main screen if they come up within the set amount of days
- Certificates warn before days
- Expiring Certificates will be included if expiring within the set number of days and shown in the list on the Main screen.
- Show only assigned Incidents
- If checked only Incidents assigned to the application user will be shown, if unchecked all ongoing Incidents will be shown on the Main screen.
- Include loaner Workstations
- LDAP Groups
- LDAP Group script path
- Define a path to a PowerShell script that creates new LDAP Groups. You will have to provide this script. The application will only execute it – any details and names need to be defined inside the script.
- Alternative User Option
- Current User – use the current user to execute the script
- Alternative User – always use this username to execute the script, e.g., “Administrator”
- Add Prefix – adds the defined prefix to the current username, e.g., “Admin_JohnDoe”
- Add Suffix – adds the defined suffix to the current username, e.g., “JohnDoe_Admin”
- Alternative Username
- only used if option set accordingly above
- Alternative User Prefix
- only used if option set accordingly above
- Alternative User Suffix
- only used if option set accordingly above
- LDAP Group script path
- Workstations
- Auto set replace in months
- Define a number of months that will be added to the purchase date. This will set the replace on date in Workstations automatically, once the purchase date is set.
- Auto set replace in months
- Incidents
- Folder path for Incidents
- Define a path to a folder where new Incident’s folders can be created. Under Incidents users can click on a button to automatically create a folder in this path and save documents and files that go along with this Incident. All users should be able to reach this path.
- Folder path for Incidents
- Projects
- Project number prefix
- This Prefix will be put before each project. By default, it is set to ITP – IT-Project.
- Folder path for Projects
- User can click on a button to create new folders for a Project to save additional files and documents. This path should be accessible by all users.
- Project number prefix
- Checklists
- Alternative User Option
- Current User – use the current user to execute the script
- Alternative User – always use this username to execute the script, e.g., “Administrator”
- Add Prefix – adds the defined prefix to the current username, e.g., “Admin_JohnDoe”
- Add Suffix – adds the defined suffix to the current username, e.g., “JohnDoe_Admin”
- Alternative Username
- only used if option set accordingly above
- Alternative User Prefix
- only used if option set accordingly above
- Alternative User Suffix
- only used if option set accordingly above
- Alternative User Option
- Employees
- LDAP Group script path
- Define a path to a PowerShell script that creates new LDAP Users. You will have to provide this script. The application will only execute it – any details and names need to be defined inside the script.
- Alternative User Option
- Current User – use the current user to execute the script
- Alternative User – always use this username to execute the script, e.g., “Administrator”
- Add Prefix – adds the defined prefix to the current username, e.g., “Admin_JohnDoe”
- Add Suffix – adds the defined suffix to the current username, e.g., “JohnDoe_Admin”
- Alternative Username
- only used if option set accordingly above
- Alternative User Prefix
- only used if option set accordingly above
- Alternative User Suffix
- only used if option set accordingly above
- LDAP Group script path
- Reminders
- CC Helpdesk recipient
- In Reminders there is a checkbox CC Helpdesk, if clicked the e-mail address set here will be added to the CC list for recipients.
- CC Helpdesk recipient
- SNMP
- Enabled
- Enabled or disabled the SNMP function for printers.
- Interval in hours
- Interval in which the SNMP requests should check for current page counts on printers. Chose it not to low, as only online printers can be reached, and data collected.
- Deployment Status
- Define the Deployment level – only printers on this status will be checked via SNMP. This excludes any not deployed systems and avoids overhead.
- Timeout in seconds
- Timeout for the SNMP requests towards every printer. Do not set this to high, a value of 30 or less is recommended.
- Enabled
- LDAP sync
- Enabled
- Enable or disable the LDAP synchronization functionality.
- Interval in minutes
- Define how often the Service should look for changes within your LDAP structure.
- Start DN
- LDAP sync will only look for changes under this distinguished name / LDAP path. By default, it should be something like DN=company,DN=local.
- Reporting enabled
- Enable this if you want to receive daily reports of what changed within your LDAP structure.
- E-Mail Sender
- Specify the sender e-mail address for the LDAP reports.
- E-Mail Recipient
- Specify the recipient e-mail address for the LDAP reports.
- E-Mail Subject
- Define the subject line for your LDAP reports.
- Enabled
- WMI
- Enabled
- Enable of disable the WMI checks for Workstations and Servers.
- Keep in mind – the user that is executing the IT-Admins CMDB Service will need to have the rights to connect to those systems via WMI.
- Deployment Status
- Only systems in this deployment status will be used for WMI checks
- Interval in minutes
- Define in which Interval the system should try to go through the devices and see if it can get WMI data. Systems need to be online and reachable, otherwise they will be jumped over and tried next interval.
- Multithreading
- Allows you to adjust the amount of WMI threads that the service will run parallel. The default is 5 threads – meaning 5 computers are tried at the same time. If you go higher, the service might need more CPU and RAM as well as increased network capacity needs, though it might go faster through the WMI enabled systems.
- Enabled
- SMTP / Mail
- SMTP Server
- IP or DNS name of your mail server.
- SMTP Port
- Your mail server port.
- SMTP Authentication
- Enable this if your mail server requires authentication.
- User
- Only needed if authentication is enabled.
- Password
- Only needed if authentication is enabled
- Sender / From
- This is the default e-mail address that will be used to send emails from. Some functions like Reminders might use their own addresses. This is a default and fallback address.
- Fallback Recipient
- If the system cannot identify a recipient e-mail address, it will default back to this address and still send out the required / requested e-mail.
- Recipient Separator
- This is the symbol/character that will be used to separate e-mail addresses.
- SMTP Server
List based
You can partly define your own options and add more (you can NOT remove any!) or simply rename or translate others. This all depends on the. See below for more details.
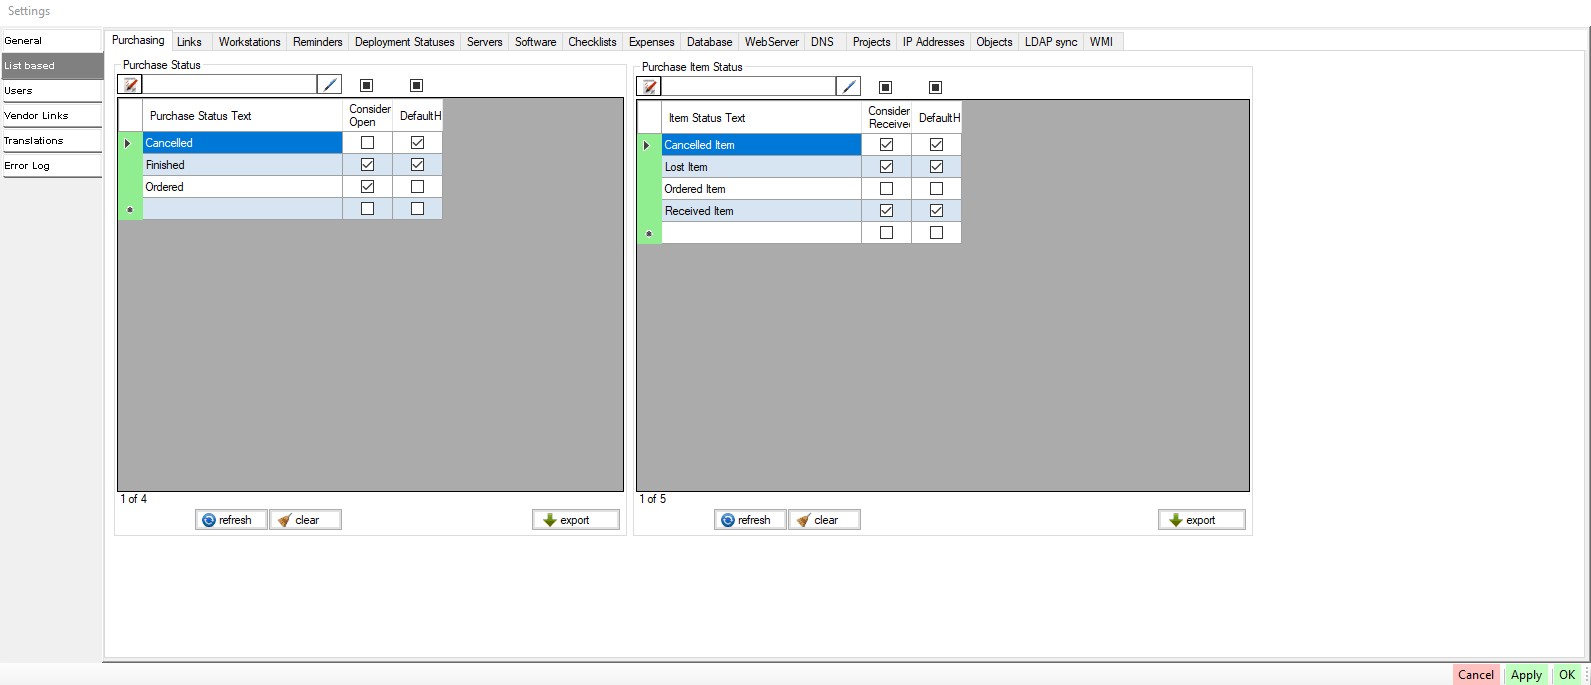
- Purchasing
- Define the status options for both – the purchase itself and the line item. There are options that will define if the purchase is still considered open or if it is closed as well as if the line is filtered by the default filter.
- Links
- Here you can set and adjust the Link Access levels. A higher level can always see links of a lower level, but not vice versa.
- Workstations
- Define the types of Workstations.
- Reminders
- These are pre-set but you can add more or adjust them. Define the names and set the Years/Months/Days/Hours/Minutes of when this repeater setting will create the next reminder if chosen.
- Deployment Statuses
- Rename the pre-set deployment statuses and define if they should be hidden by default or not. You also can create new statuses.
- Servers
- Servers are divided in three types – actual server assets, infrastructure assets and other assets. Here you can rename them and add more and define to which category they belong.
- Software
- You can rename and define more License Types – that can be used in Software to define what type this license document is.
- Checklists
- This is for translation/renaming only.
- Expenses
- You can define Expense Types, Codes and Terms. Terms are the only special one, as a term of 1 year will have a factor of 1 to calculate the annual cost. A 3 year 0.33333 and a 1 month a factor of 12. This is all to calculate the annual cost on the expense cost.
- Database
- These are pre-set but you can rename them as needed and add more. TIR-Levels are not affecting anything, they are merely for your documentation. The status of databases is independent from the more generic deployment status and can be adjusted here.
- WebServer
- Define the available Webserver protocols here.
- DNS
- Define the available DNS entry types here
- Projects
- Here you can adjust the project statuses and add more if needed. Disposition and Priority are as well adjustable.
- IP Addresses
- Allows you to define the type of an IP address. You can rename the existing types or add more as you need them.
- Objects
- These are only for translation purpose here. You cannot edit all fields. Rename the data in the rows as needed to adjust to your language needs.
- LDAP sync
- These are only for translation purpose here. You cannot edit all fields. Rename the data in the rows as needed to adjust to your language needs.
- WMI
- These are only for translation purpose here. You cannot edit all fields. Rename the data in the rows as needed to adjust to your language needs.
Users
 Users are application users. Their usernames need to be the same as their Windows username. The application will check if they are allowed to open it and what rights they have automatically.
In order to create a new user, click on the NEW button and provide the Windows username without any domain part.
Once it was created, you need to click on the RIGHTS button to create all rights for this user.
By default, every user gets full rights, please see the list of special rights further below for a few considerations, especially the Settings-Right is something you might want to restrict.
Especially after updates there is a chance that new rights have been introduced, if you want to apply them to existing users, you need to select them and click on the rights button to create the rights, otherwise they will be treated as no access.
User rights are only read in when the application is started. Users need to close and open the application for the right changes to take effect.
Language settings are on a per user basis. This allows to have users use their own language if available.
Special rights:
- Edit Asset Tags – either write or not
- If set to write users will see a button next to any asset tags that allows them to edit this asset tag.
- Checklists Unlock & Remove
- If set to write, users will be able to unlock closed checklists or remove checklists altogether.
- SQL builder
- SQL builder is primarily used in Checklist templates. This allows to see raw data in the database and execute SQL statements. Only SQL experienced users should execute this.
- IT Supplies config
- Only write users will have access to all fields in IT Supplies, other will only have inventory rights.
- Settings
- Allows access to the application settings and therefor as well the user rights management
Vendor Links
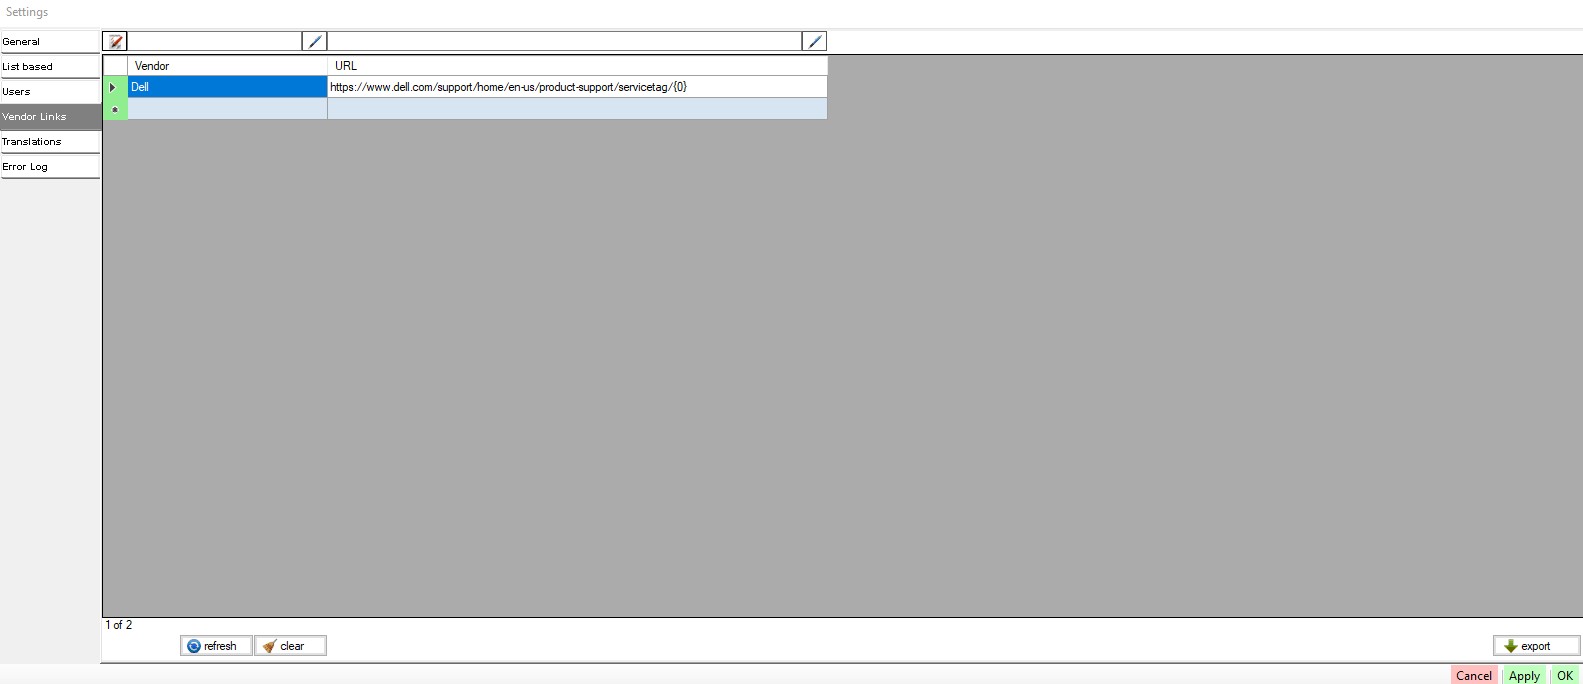 Assets of the various types can show a button next to the serial number field to open a web-address of the vendor and injecting the serial number into the URL. Here you can add every vendor and define a URL as well as where to put the serial number from the data record / asset as per {0} in the URL.
Be aware that those vendor names need to go along with what is set on the record / asset. You might even need duplicates in some circumstances. Not every vendor allows such functionality on their web portal. This is very individual, and the application only offers the functionality to do this in case the vendor website supports it. These links might change over time as well and might need adjustment.
Translations
![]()
![]() Here you can adjust about any text that the application uses. You will be able to modify English, German and New Language. In the columns you see where it is used and the original text that was first seen by this function. It is possible that new lines are added over time, as specific text within the code is accessed and automatically added to the translator table. You can check back here and adjust these texts as well. The system will auto-learn. Clicking on APPLY will reload the table to the translator module. You can close the specific module and re-open it to check and see the adjusted text.
Here you can adjust about any text that the application uses. You will be able to modify English, German and New Language. In the columns you see where it is used and the original text that was first seen by this function. It is possible that new lines are added over time, as specific text within the code is accessed and automatically added to the translator table. You can check back here and adjust these texts as well. The system will auto-learn. Clicking on APPLY will reload the table to the translator module. You can close the specific module and re-open it to check and see the adjusted text.