gpo

Useful registry keys to supplement settings not available in standard GPO templates

This blog entry will list some registry keys to control computer and user settings via GPO but aren’t available in the standard ADMX GPO templates.

Below you find always the same data format:

  • Computer Configuration or User Configuration
  • HIVE
  • Kay Path
  • Value Name
  • Value Type
  • Value Data
  • Short explanation
  • Link if available

Over the years I also always tried to leave a comment in the GPO’s, especially for the Registry Keys, so I could later identify them quickly and possibly even leaving a link so others could read up on these settings and options without doing long research.

Show Drive Letters first in Windows Explorer

This Registry value is set in two areas – Computer Configuration and User Configuration. See both keys below.

  • Computer Configuration
  • HKEY_LOCAL_MACHINE
  • SOFTWARE\Microsoft\Windows\CurrentVersion\Explorer
  • ShowDriveLettersFirst
  • REG_DWORD
  • 0x4 (4)
  • Defines if the drive letter is shown first in Windows Explorer
    • 0 = After
    • 1 = Mixed
    • 2 = No drive letter
    • 3 = Before
  • User Configuration
  • HKEY_CURRENT_USER
  • Software\Microsoft\Windows\CurrentVersion\Explorer
  • ShowDriveLettersFirst
  • REG_DWORD
  • 0x4 (4)
  • Defines if the drive letter is shown first in Windows Explorer
    • 0 = After
    • 1 = Mixed
    • 2 = No drive letter
    • 3 = Before

Support URL

  • Computer Configuration
  • HKEY_LOCAL_MACHINE
  • SOFTWARE\Microsoft\Windows\CurrentVersion\OEMInformation
  • SupportURL
  • REG_SZ
  • URL to your support system
  • Set the Windows Support URL shown in the Computer Properties in the Support section – Link is behind the Online Support Website.

Support Hours

  • Computer Configuration
  • HKEY_LOCAL_MACHINE
  • SOFTWARE\Microsoft\Windows\CurrentVersion\OEMInformation
  • SupportHours
  • REG_SZ
  • e.g.:  0800-1700 Pacific Time
  • Set the Windows Support Hours shown in the Computer Properties in the Support section.

Support Hours

  • Computer Configuration
  • HKEY_LOCAL_MACHINE
  • SOFTWARE\Microsoft\Windows\CurrentVersion\OEMInformation
  • SupportPhone
  • REG_SZ
  • your helpdesk phone number
  • Set the Windows Support Phone Number shown in the Computer Properties in the Support section.

Support Manufacturer

  • Computer Configuration
  • HKEY_LOCAL_MACHINE
  • SOFTWARE\Microsoft\Windows\CurrentVersion\OEMInformation
  • Manufacturer
  • REG_SZ
  • Suggest to put in your Company name here
  • Set the Manufacturer Name / Company Name shown in the Computer Properties in the Support section.

Hide Drives with no Media

  • User Configuration
  • HKEY_CURRENT_USER
  • Software\Microsoft\Windows\CurrentVersion\Explorer\Advanced
  • HideDrivesWithNoMedia
  • REG_DWORD
  • 00000000
  • If set to 0x0 (0) it will not hide empty drives, if set to 0x1 (1) it will hide empty drive letters from Windows Explorer.

Expand folders to current folder

  • User Configuration
  • HKEY_CURRENT_USER
  • Software\Microsoft\Windows\CurrentVersion\Explorer\Advanced
  • NavPaneExpandToCurrentFolder
  • REG_DWORD
  • 0x1 (1)
  • This will expand all folders to the current folder in the navigation panel of Windows Explorer, by default it will only navigate to the folder but not expand the path to it in the Navigation Panel. The behavior on this changed back in Windows Vista or Windows 7. This sets it back to a more Windows XP like behavior, what makes it easier to navigate Windows Explorer.

Fast Boot Enabled

  • Computer Configuration
  • HKEY_LOCAL_MACHINE
  • SYSTEM\CurrentControlSet\Control\Session Manager\Power
  • HiberbootEnabled
  • REG_DWORD
  • 0x0 (0)
  • Turns off Windows 10 Fast Startup – meaning a real reboot is done rather then a quick reboot that is actually not a real Windows reboot. A real reboot is slower, but much cleaner.

Office 365 – Update Channel

There is a settings in the Office ADMX files under Microsoft Office 2016 (Machine)/Updates for:

  • Enable Automatic updates
  • Update Channel
  • Update Deadline

Additionally this settings should be set to make sure everything is configured the same and installs the same:

  • Computer Configuration
  • HKEY_LOCAL_MACHINE
  • SOFTWARE\Microsoft\Office\ClickToRun\Configuration
  • CDNBaseUrl
  • REG_SZ
  • http://officecdn.microsoft.com/pr/492350f6-3a01-4f97-b9c0-c7c6ddf67d60
  • This will set the Office 365 channel to current for the click to run installation.

Allow Print Driver Installation

  • Computer Configuration
  • HKEY_LOCAL_MACHINE
  • SOFTWARE\Policies\Microsoft\Windows NT\Printers\PointAndPrint
  • RestrictDriverInstallationToAdministrators
  • REG_DWORD
  • 0x0 (0)
  • Microsoft released KB5005652 which requires admin rights to install printers, and affects some existing printers that will require an admin to install driver update. Work around is to add the registry key below, which disabled this new security feature.
    • Value: 0
      • Allow non-admin users to install Point and Print printer drivers
    • Value: 1
      • Blocks non-admin users from installing Point and Print printer drivers. If this registry key does not exist, the default with KB installed will be same as Value 1, blocking non-admins from installing Point and Print printer drivers.
  • https://support.microsoft.com/en-us/topic/kb5005652-manage-new-point-and-print-default-driver-installation-behavior-cve-2021-34481-873642bf-2634-49c5-a23b-6d8e9a302872

Ensure Outlook is the default mail client

  • User Configuration
  • HKEY_CURRENT_USER
  • Software\Clients\mail
  • (Default)
  • REG_SZ
  • Microsoft Outlook
  • Ensures Microsoft Outlook is the standard mail client

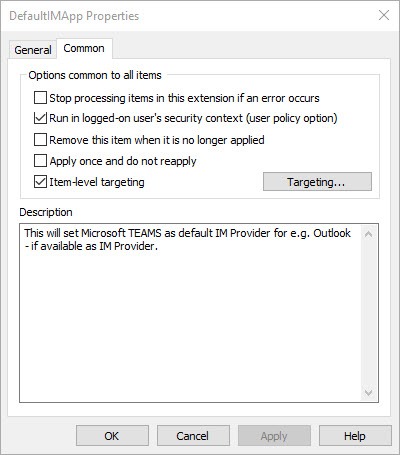
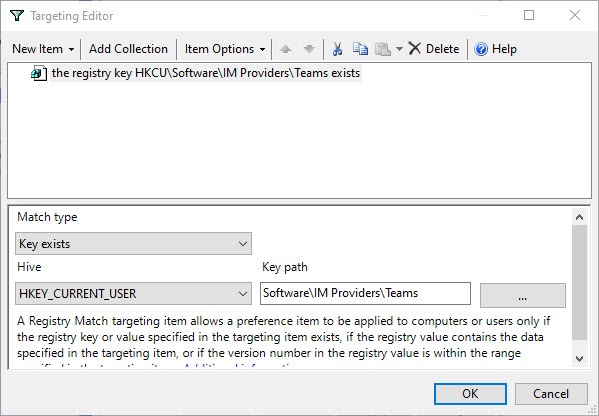
Set Microsoft Teams as the default IM application

See this blog entry as well about this.

  • User Configuration
  • HKEY_CURRENT_USER
  • Software\IM Providers
  • DefaultIMApp
  • REG_SZ
  • Teams
  • Sets Microsoft Teams as the default Instant Messenger Application.

Set Microsoft Office to read User information from Active Directory

Make sure you set both registry keys for this.

Set this to “Apply once and do not reapply” as well.

This will cause Microsoft Office applications read any user information fresh from Active Directory, as it cleans the current values.

  • User Configuration
  • HKEY_CURRENT_USER
  • Software\Microsoft\Office\Common\UserInfo
  • UserName
  • (not set)
  • (not set)
  • This will cause the first Office application to read the information from Active Directory and re-create it specifically for the user.
  • User Configuration
  • HKEY_CURRENT_USER
  • Software\Microsoft\Office\Common\UserInfo
  • UserInitials
  • (not set)
  • (not set)
  • This will cause the first Office application to read the information from Active Directory and re-create it specifically for the user.

Disable the Network Sharing Wizard in Windows Explorer

  • User Configuration
  • HKEY_CURRENT_USER
  • Software\Microsoft\Windows\CurrentVersion\Explorer\Advanced
  • SharingWizardOn
  • REG_DWORD
  • 0x0 (0)
  • Disables the Sharing Wizard in Windows Explorer.

Remove the Network form Windows Explorer

Probably one of the more important security measures you can do, to avoid the standard user browsing other systems on the network to much. It does not really prevent it, but makes it a lot less easy for regular end users, as the network area in Windows Explorer simply vanishes.

  • User Configuration
  • HKEY_CURRENT_USER
  • Software\Microsoft\Windows\CurrentVersion\Explorer\Advanced
  • {F02C1A0D-BE21-4350-88B0-7367FC96EF3C}
  • REG_DWORD
  • 0x1 (1)
  • Remove Network from Windows Explorer.

Remove Administrative Tools from the Start Menu

This is made out of two combined registry keys. You will need to apply both for this to take affect.

Highly recommend to make sure it does not apply to any administrator accounts, as this can be contra productive.

  • User Configuration
  • HKEY_CURRENT_USER
  • Software\Microsoft\Windows\CurrentVersion\Explorer\Advanced
  • Start_AdminToolsRoot
  • REG_DWORD
  • 0x0 (0)
  • Removes administrative tools from the start menu.
  • User Configuration
  • HKEY_CURRENT_USER
  • Software\Microsoft\Windows\CurrentVersion\Explorer\Advanced
  • StartMenuAdminTools
  • REG_DWORD
  • 0x0 (0)
  • Removes administrative tools from the start menu.

Windows Update Restart Notifications for End Users

Please apply both Registry Keys for this to take affect.

  • Computer Configuration
  • HKEY_LOCAL_MACHINE
  • SOFTWARE\Microsoft\WindowsUpdate\UX\Settings
  • RestartNotificationsAllowed
  • REG_DWORD
  • 0x1 (1)
  • Will display Restart Notifications to End Users.
  • Computer Configuration
  • HKEY_LOCAL_MACHINE
  • SOFTWARE\Microsoft\WindowsUpdate\UX\Settings
  • RestartNotificationsAllowed2
  • REG_DWORD
  • 0x1 (1)
  • Will display Restart Notifications to End Users.


Make Microsoft TEAMS the default IM application

Make Microsoft TEAMS the default IM application

Having multiple applications that act as chat respective IM application but you want Microsoft TEAMS to be the default Instant Messenger application especially so Outlook e.g. shows the correct online/offline as well as free and busy status for employees and so they can start a conversation directly from there, you will need to make sure that Microsoft TEAMS is the default IM Provider.

This came up especially in combination with Cisco Jabber, that is often used as the software phone client for a Cisco phone system. This application might overrule the user settings and take presence especially in Microsoft Outlook. Cisco has an article about this here that talks about various registry keys. But this is actually not the direct solution for this issue.

In order to set TEAMS, if installed, the default application for your employees, it is easiest to engage Group Policies, GPOs, for this. Simply follow the below steps. Those settings will find out if Microsoft TEAMS is available and if so set it as default IM Provider. Close Microsoft Outlook and open it again and you will see the status icons and message box being associated with Microsoft TEAMS.

Of course, you could slightly adjust the suggested GPO settings and engage e.g. Cisco Jabber or any other IM provider available instead. Just have a look at the registry path HKEY_CURRENT_USER\Software\IM Providers and see what is available and set the GPO accordingly. All you need is the name of the sub key for the DefaultIMApp value.

Steps for the user GPO

  1. Create a new GPO (or chose an existing GPO)
    1. This will be a User Configuration
  2. Navigate to User Configuration\Preferences\Windows Settings\Registry
  3. Create a new Registry Item
  4. Settings on General tab
    1. Leave the Action settings to Update
    2. Hive: HKEY_CURRENT_USER
    3. Key Path: Software\IM Providers
    4. Value name: DefaultIMApp
    5. Value type: REG_SZ
    6. Value data: Teams
  5. Settings on Common tab
    1. Check Run in logged-on user’s security contact (user policy option)
    2. Check Item-level targeting
    3. Click on Targeting and apply the following settings
      1. The following steps make sure that this is only applied if Microsoft TEAMS is available as a IM provider
      2. Click on New Item and chose Registry Match
      3. Match type: Key exists
      4. Hive: HKEY_CURRENT_USER 
      5. Key Path: Software\IM Providers\Teams
    4. It is good practice to provide a Description for this item – e.g.: This will set Microsoft TEAMS as default IM Provider for e.g. Outlook – if available as IM Provider.


Make sure the GPO applies to your users and you should be all set. This will make sure that even if a new application is installed and takes the IM Provider role over, that your clients will still fall back to Microsoft TEAMS. Of course, it will depend on when the GPO was reapplied and that the user actually closes and reopens Outlook.


Excel custom views and Excel files that appear different for various users

Excel custom views and Excel files that appear different for various users

Excel has a feature called Custom Views (ribbon VIEW / CUSTOM VIEW) that is very little known. This feature actually allows to adjust header / footer or columns that are hidden or displayed etc… a custom view for the workbook.

Custom Views are stored in the workbook it self. Further are they automatically selected when opening a workbook.

How does Excel determine which custom view to use?

Under OPTIONS / GENERAL in the field USER NAME should be in most cases your FULL NAME from your Windows logon user respective Active Directory user. This name actually determines which custom view is used. If you alter the name to another custom view name you will automatically see this custom view – or it default back to the default view.

This becomes an even bigger issue if you are using SYSPREP images and you set the default user profile from an existing profile via the COPYPROFILE option – see here for details: https://docs.microsoft.com/en-us/windows-hardware/manufacture/desktop/customize-the-default-user-profile-by-using-copyprofile.

If the source profile had EXCEL open – or actually any other OFFICE program – you will find the following registry keys set:

  • HKEY_CURRENT_USER\Software\Microsoft\Office\Common\UserInfo
    • Company
    • UserInitials
    • UserName

The critical key in this case is USERNAME.

Imagine you deploy this image with this pre-set username-key to 100 computers. One of the users now sets a CUSTOM VIEW and another user opens the file – this user will actually see the custom view because both users would have the same USERNAME value set, what was pre-set in the image. Now you have a third user that you manually installed from scratch – this user will see different values in his worksheet – Excel header and footer or columns etc…

This sure would give you some headache and would sure will wonder how can this happen.

To be pro-active – and even prevent other related issues – you should remove those three keys from any logging on user. If you remove those keys and the user opens an Office application, they will be automatically recreated depending on the current Windows or Active Directory user name and credentials.

Probably the best way to accomplish this is a GPO that applies to ALL USERS and removes those registry keys. Just make sure you check as well “apply once”.

Having this said – I as well saw circumstances where this did not help – likely due to the users have been logged on and in an Microsoft Office application. The keys had been removed, but after closing the application the old keys had been written back to the registry. Due to that you might need either a solution per PowerShell or CMD/Batch script that removes those keys when the users logs on.

You could determine if they are correct or not and if not simply delete them.

I tried to find a solution for the USERNAME value in the registry from the GPO variables – use the F3 key in the GPO Editor to show available variables (https://blogs.technet.microsoft.com/grouppolicy/2009/05/13/environment-variables-in-gp-preferences/) – you will quickly get stuck on that the full user name is not available. Therefor a script might be your best shot.

A simple solution might be using this in a CMD based login script:

Additional information can be found here as well: https://support.microsoft.com/en-us/help/302911/the-page-setup-settings-in-a-shared-workbook-are-different-for-each-us

Enable SMBv1 on Windows 10 per GPO

Enable SMBv1 on Windows 10 per GPO

SMBv1 is an insecure protocol that you should not use if by any means possible. Windows 10 has SMBv1 disabled by default. In order to enable it you would need to go to the Control Panel and activate the Windows Feature “SMB 1.0/CIFS File Sharing Support” and at a bare minim the “SMB 1.0/CIFS Client“. You actually might just want to do that cause you really shouldn’t add more SMBv1 servers to your network.

Before you proceed reading – if you really need to enable this protocol – please make sure your systems are all patched! Especially your target servers should be patched as well – assuming they are Windows XP / 2003 / Vista / 2008 / 7 / 2008 R2 / 8 / 8.1 / 2012 / 2012 R2 / 2016 and 10. I highly recommend to look at this Microsoft link: https://docs.microsoft.com/en-us/security-updates/securitybulletins/2017/ms17-010. Additionally do I want to mention that Windows XP and Windows 2003 can be patched as well – though they are not on the list of the previous link. Look at Microsoft KB4012598 for more information or use this download link https://www.microsoft.com/en-us/download/details.aspx?id=55245. I can not warn enough about SMBv1 – you open the doors for malware here that can bring down your network in minutes and cause huge damage!

Please note – I did not research in detail if other previous Windows versions did disabled SMBv1 already by default, this article might in any case apply to Windows 7, 8 and 8.1 as well and be applicable to Windows 2008, 2008 R2, 2012, 2012 R2 and 2016 as well as newer Windows versions to come.

Now, the issue with Windows 10 and SMBv1 disabled is that often old legacy Windows 2003 servers are around that can’t just be upgraded or replaced. In order to access any file share you would need to enable SMBv1 on the client workstations. This could sure be done by preparing your installation image etc. – but if you did not plan for this or want to have more granular control, you might consider using Group Policies / GPO to enabled this Windows Feature.


It is further worth noting that the easiest way to find the issue is not trying to access the UNC share via the server-name rather then directly typing in the IP address in your attempt. This way you actually get a way clearer error-message from Windows. I mention this, to show you and explain that there actually is a difference between trying to access a server-name and an IP address per UNC path – especially when it comes down to Windows 10 and the error messages you might see.

Officially enabling a Windows Feature is not supported per GPOs nor is there much information out there on how to enable SMBv1 per GPO. Having faced this challenge recently, I found a good working way that is pretty easy to implement.

  1. enable the feature on 1x Windows 10 client
    1. export / document the registry key HKEY_LOCAL_MACHINE\SYSTEM\CurrentControlSet\Services\mrxsmb10
    2. copy the file %windir%\system32\drivers\mrxsmb10.sys
  2. create a GPO
    1. put the mrxsmb10.sys in the GPO or a central accessible file (the target computer account must be able to read the file! – I often put it in either NETLOGON or directly in the GPO / scripts folder)
    2. Computer Configuration \ Preferences \ Windows Settings \ Files
      1. create a new entry to copy the file to the target system
      2. Source file: where you centrally placed the mrxsmb10.sys
      3. Destination file: %windir%\system32\drivers\mrxsmb10.sys
    3. Computer Configuration \ Preferences \ Windows Settings \ Registry
      1. Create or import all the registry keys from HKEY_LOCAL_MACHINE\SYSTEM\CurrentControlSet\Services\mrxsmb10

A registry hive export would look like this:

Apply the GPO to your target systems / workstations and reboot them – after that you will be able to access the necessary shares. The downside is – you don’t really see the feature as enabled in the Windows-Features. It will work nevertheless.