office

Make Microsoft TEAMS the default IM application

Make Microsoft TEAMS the default IM application

Having multiple applications that act as chat respective IM application but you want Microsoft TEAMS to be the default Instant Messenger application especially so Outlook e.g. shows the correct online/offline as well as free and busy status for employees and so they can start a conversation directly from there, you will need to make sure that Microsoft TEAMS is the default IM Provider.

This came up especially in combination with Cisco Jabber, that is often used as the software phone client for a Cisco phone system. This application might overrule the user settings and take presence especially in Microsoft Outlook. Cisco has an article about this here that talks about various registry keys. But this is actually not the direct solution for this issue.

In order to set TEAMS, if installed, the default application for your employees, it is easiest to engage Group Policies, GPOs, for this. Simply follow the below steps. Those settings will find out if Microsoft TEAMS is available and if so set it as default IM Provider. Close Microsoft Outlook and open it again and you will see the status icons and message box being associated with Microsoft TEAMS.

Of course, you could slightly adjust the suggested GPO settings and engage e.g. Cisco Jabber or any other IM provider available instead. Just have a look at the registry path HKEY_CURRENT_USER\Software\IM Providers and see what is available and set the GPO accordingly. All you need is the name of the sub key for the DefaultIMApp value.

Steps for the user GPO

  1. Create a new GPO (or chose an existing GPO)
    1. This will be a User Configuration
  2. Navigate to User Configuration\Preferences\Windows Settings\Registry
  3. Create a new Registry Item
  4. Settings on General tab
    1. Leave the Action settings to Update
    2. Hive: HKEY_CURRENT_USER
    3. Key Path: Software\IM Providers
    4. Value name: DefaultIMApp
    5. Value type: REG_SZ
    6. Value data: Teams
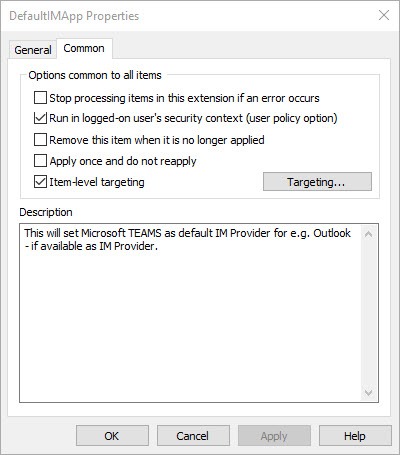
  5. Settings on Common tab
    1. Check Run in logged-on user’s security contact (user policy option)
    2. Check Item-level targeting
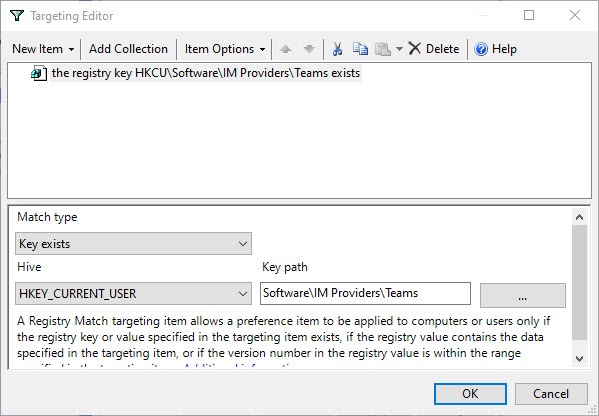
    3. Click on Targeting and apply the following settings
      1. The following steps make sure that this is only applied if Microsoft TEAMS is available as a IM provider
      2. Click on New Item and chose Registry Match
      3. Match type: Key exists
      4. Hive: HKEY_CURRENT_USER 
      5. Key Path: Software\IM Providers\Teams
    4. It is good practice to provide a Description for this item – e.g.: This will set Microsoft TEAMS as default IM Provider for e.g. Outlook – if available as IM Provider.


Make sure the GPO applies to your users and you should be all set. This will make sure that even if a new application is installed and takes the IM Provider role over, that your clients will still fall back to Microsoft TEAMS. Of course, it will depend on when the GPO was reapplied and that the user actually closes and reopens Outlook.


Excel custom views and Excel files that appear different for various users

Excel custom views and Excel files that appear different for various users

Excel has a feature called Custom Views (ribbon VIEW / CUSTOM VIEW) that is very little known. This feature actually allows to adjust header / footer or columns that are hidden or displayed etc… a custom view for the workbook.

Custom Views are stored in the workbook it self. Further are they automatically selected when opening a workbook.

How does Excel determine which custom view to use?

Under OPTIONS / GENERAL in the field USER NAME should be in most cases your FULL NAME from your Windows logon user respective Active Directory user. This name actually determines which custom view is used. If you alter the name to another custom view name you will automatically see this custom view – or it default back to the default view.

This becomes an even bigger issue if you are using SYSPREP images and you set the default user profile from an existing profile via the COPYPROFILE option – see here for details: https://docs.microsoft.com/en-us/windows-hardware/manufacture/desktop/customize-the-default-user-profile-by-using-copyprofile.

If the source profile had EXCEL open – or actually any other OFFICE program – you will find the following registry keys set:

  • HKEY_CURRENT_USER\Software\Microsoft\Office\Common\UserInfo
    • Company
    • UserInitials
    • UserName

The critical key in this case is USERNAME.

Imagine you deploy this image with this pre-set username-key to 100 computers. One of the users now sets a CUSTOM VIEW and another user opens the file – this user will actually see the custom view because both users would have the same USERNAME value set, what was pre-set in the image. Now you have a third user that you manually installed from scratch – this user will see different values in his worksheet – Excel header and footer or columns etc…

This sure would give you some headache and would sure will wonder how can this happen.

To be pro-active – and even prevent other related issues – you should remove those three keys from any logging on user. If you remove those keys and the user opens an Office application, they will be automatically recreated depending on the current Windows or Active Directory user name and credentials.

Probably the best way to accomplish this is a GPO that applies to ALL USERS and removes those registry keys. Just make sure you check as well “apply once”.

Having this said – I as well saw circumstances where this did not help – likely due to the users have been logged on and in an Microsoft Office application. The keys had been removed, but after closing the application the old keys had been written back to the registry. Due to that you might need either a solution per PowerShell or CMD/Batch script that removes those keys when the users logs on.

You could determine if they are correct or not and if not simply delete them.

I tried to find a solution for the USERNAME value in the registry from the GPO variables – use the F3 key in the GPO Editor to show available variables (https://blogs.technet.microsoft.com/grouppolicy/2009/05/13/environment-variables-in-gp-preferences/) – you will quickly get stuck on that the full user name is not available. Therefor a script might be your best shot.

A simple solution might be using this in a CMD based login script:

Additional information can be found here as well: https://support.microsoft.com/en-us/help/302911/the-page-setup-settings-in-a-shared-workbook-are-different-for-each-us

Inserting tables as pictures

Inserting tables as pictures

Microsoft Office has since a very long time a bug when it comes to copied data from Excel that you try to past as a picture in to a other Office application. The table often gets totally messed up might miss rows and columns even. This happens when you copy the data from Excel and try to insert it in to e.g. Microsoft Word with the special insert option Insert as Picture.

The issue is well known and the solution is actually pretty simple – you don’t copy the data from Excel, you copy a picture with a specific setting.

This also allows you to insert the copied data respective image in to any other application as an picture without using screenshot tools like the Windows internal Snipping tool.

Instructions:

  1. select the rows and columns you want to copy in Excel (mark them)
  2. while on the Home ribbon, click the little drop down icon next to the Copy button
  3. select Copy as Picture
  4. switch the appearance to As shown when printed
  5. and click OK
  6. now insert the PICTURE that you copied where you need it – this will not be a formatted table / text-data

Please note – you can also change your quick access menu in Excel and add the Copy As Image there for easier access to it.