Please follow these instructions to install and configure the IT Admins CMDB. The process is a rather easy and straight forward. Please use the contact form if you have any questions.
Before we begin:
You will need a Microsoft SQL 2019 or newer installed somewhere within your system. This can be either a full version or a Express version that you download for free from Microsoft. The Express edition has limitations, in most cases you likely will not exhaust those limitations assuming you have not more then 10 users at the same time and not e.g., more then 10 GB of data, what would be quite a lot for this database.
Note: SQL (especially SQL Express) might be configured to not allow remote connections, respective connections through the network. Make sure any e.g., Windows Firewall settings are set correct (incoming for SQL Service e.g.) and that e.g., named pipes and TCP/IP are configured right on the SQL Service – SQL Configuration. If this is not the case, you might not be able to access the database from a remote client. You might be able to test this by using the Windows internal ODBC settings in Administrative Tools and try to connect to the database.
In any case – a proper backup is highly recommended. You should use SQL maintenance plans if you have a full version of Microsoft SQL, if you are using Microsoft SQL Express, you might want to have a look at my blog entry about SQL Express backups.
The following steps assume you have all you need and downloaded the IT Assets database already.
Extract the ZIP file
Please extract the ZIP file to C:\Temp\ITAdminsCMDB so that all the files and folders are in this path – if you chose another path, please incorporate accordingly it should it be mentioned in the instructions below.
Restoring the database to your SQL system
Make sure the ITAdminsCMDB.bak file is accessible from your SQL Server. If you use a local SQL Express, you should not need to copy it around. The following steps guide you through the restore of the backup file to Microsoft SQL.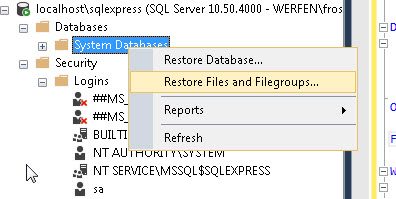
- Open the Microsoft SQL Management studio and connect to your SQL Server
- Right click on Databases and select Restore Files and Filegroups…
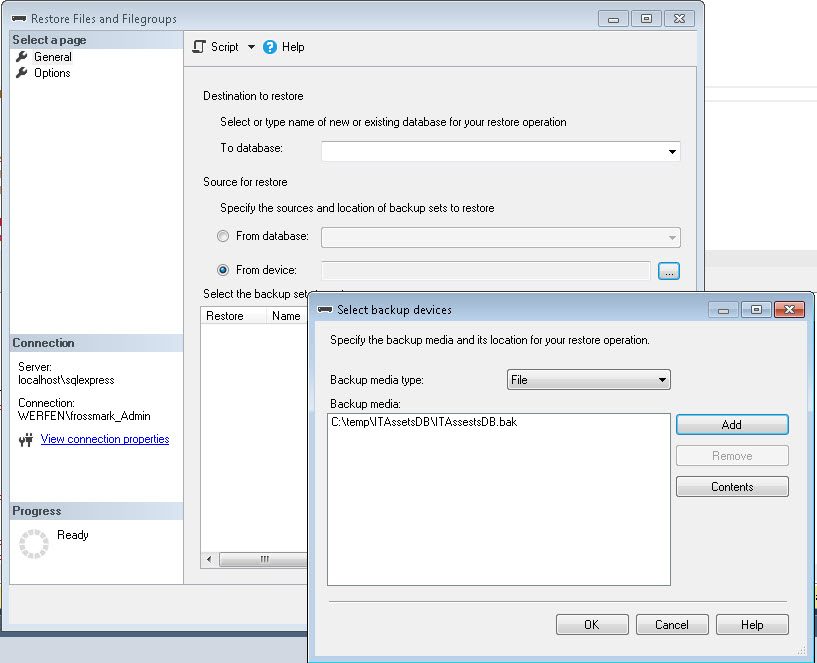
- Next you select From device and click the … button
- click on the Add button and select the ITAdminsCMDB.bak file
- close the select backup devices window
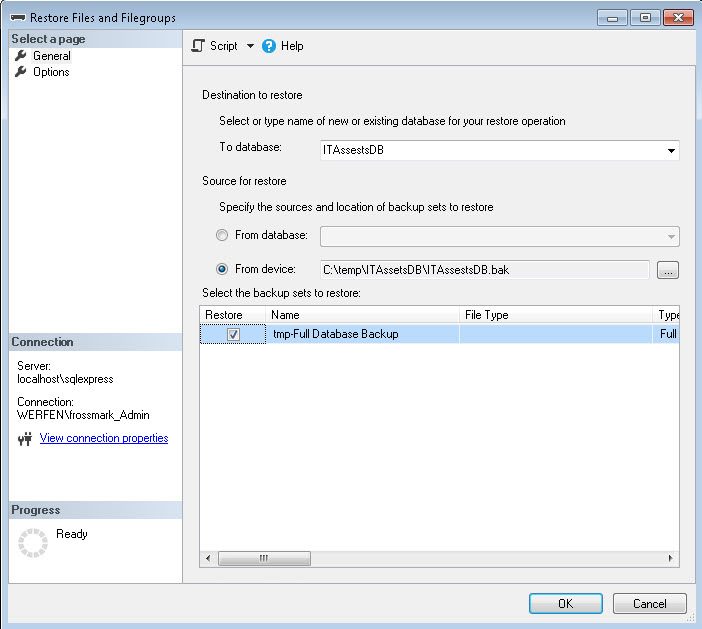
- Provide a database name in the To database field of the Restore Files and Filegroups dialog- per default you can use ITAdminsCMDB
- Check the box Restore for the selected file and click on OK to restore the database
- This should only take a few seconds.
Now you are basically done. You restored the database. To follow some best practice, I recommend you create a group in Active Directory that allows users to access the SQL database. Add your users to this group and give it access to the SQL database as indicated in the following steps.

- Navigate to Security of your SQL server – not the database
- right click and select New Login…
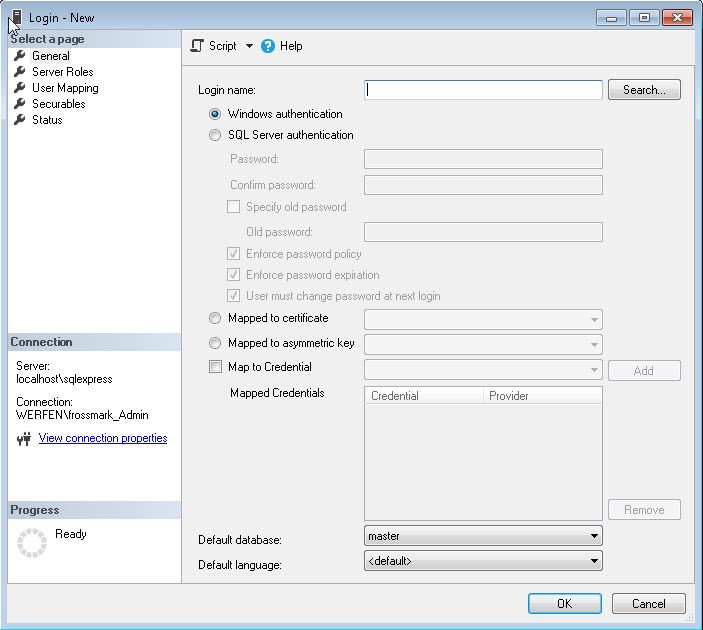
- Select your Active Directory group via the Search button
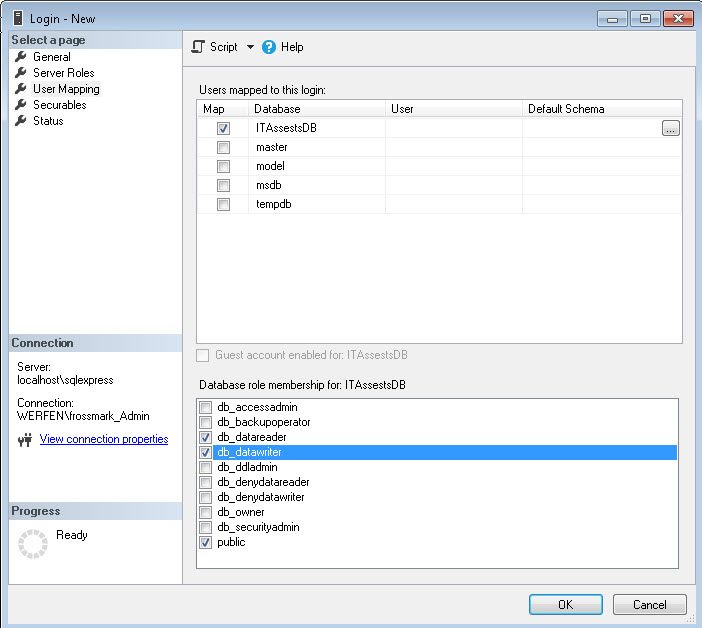
- navigate to User Mapping and map the new user to the database
- additionally check the boxes for db_datareader and db_datawriter
- and close the dialog with OK
The whole group should now be able to access the database.
Unlock the executables
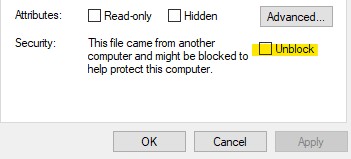 There are three executables, see list below, that might have a security lock bit enabled, as they are downloaded files. Please open the file properties of those three files and remove the lock: This file came from another computer and might be blocked to help protect this computer. Check the Unblock checkbox and click OK or Apply.
Affected files:
- IT-Admins-CMDB.exe
- IT-Admins-CMDB-Service.exe
- IT-Admins-Config.exe
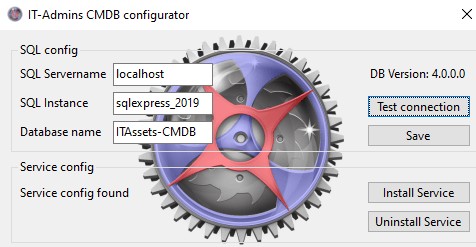
Configure the SQL connection
Start the IT-Admins-Config application and adjust the connection settings so you can reach your SQL Server.

 use the Test connection button to test your connections
- if you see an error message, check your connection settings
- no need to restart the application, you can try again
- Hint: try it without the SQL INSTANCE name, this is due to your SQL configuration, not the tool
- the Database version information will appear above the Test connection button if the connection was successful
- use the Save button to write the settings to the configuration files
Start the IT Admins CMDB application
You now can open IT-Admins-CMDB application. If the database is empty, the first user will automatically be created and get full rights assigned. Users respective their usernames must be the same as their Windows username.
Done
You are now ready to use the application.
The Windows Service
You can install the Windows Service, if you want to use features like Reminder emails, LDAP reporting and/or WMI synchronization.
It is recommended to copy all the files in a new directory under C:\Program Files and install the service from there, instead of a temporary directory or anything underneath a user profile like Downloads or Desktop.
Once the service is installed, you will need to go to Windows Services and configure it to automatically start as well as the user under which the service should execute. Make sure that the same user also has access to the database via the LDAP Group as well as inside the database as user.
Please note, WMI sync will need access rights to Workstations and Servers per WMI, this does not need to be a Domain Administrator, you can configure the WMI rights e.g., per GPO on these systems, but it might be easier to use an administrative account. In general, it is highly recommended to follow the rules of minimum rights and limited access.
To install the Windows Service, please start the IT-Admins-Config tool as Administrator, otherwise it will fail to create the service due to the Windows UAC.
Issues with the Service
If the Service does not want to start you can open a Command Prompt / CMD and start it manually from there. Add the parameter “-console” to the executable. This will allow you to see various debug messages and some output.
If necessary, use the contact form and provide the shown details for further assistance.