dfs

Setting up Windows Search Index

Setting up Windows Search Index

The Windows Search indexing is a solution from Microsoft that will index your file servers and their files full text and allow your end users to get results quickly while actually engaging the fulltext search database seamlessly.

This is accomplish by just using the search box in the upper right of the Windows Explorer while residing on a network share or mapped network drive.

Many people say that the Windows Search does not work right, but my experience is that quite the opposite is true and it only depends on the right set up. This I will explain here further.

Before we go in to details – there is a challenge that goes along with DFS namespaces. I found a way to bypass this, look here to understand how it works.

  • add an additional drive to your file servers
    • I roughly recommend about 10% of the total use size of your file shares that you want to index
    • you might be able to go with less or more – but expect 10% to be more on the safe side
  • give the new drive a drive-letter (e.g. I: for Index) and name it INDEX (to make clear that this is only to be used for the INDEX database)
  • add the following path to this drive
    • I:\ProgramData\Microsoft
    • The path above mirrors the default path on the C: drive where the index will reside by default, I recommend to mirror this path on the new target drive to keep things simple and clear
  • add the feature Windows Search to your server
  • download the Microsoft Filter Pack 2.0 and install it on your server
    • yes – this is a Office 2010 SP2 filter pack and yes that’s okay
    • just download the x64 bit version of it and install it
    • this will add a iFilter pack to Windows that allows Windows to understand DOCX and XLSX files (and others) and full text index them
  • enable the new service Windows Search
    • set it to start type automatic
    • start the service
  • from your start menu (or Control Panel) open the Indexing Options
    • click on ADVANCED
      • select the earlier created path I:\ProgramData\Microsoft as new path for the index
      • after you click on OK Windows will stop the service and move the existing index
        • you might need to manually start the service again
    • click now on MODIFY and select the server shares respectively local paths you want to index
    • if you leave the Indexing Options open you will see that Windows updates the count constantly
      • Windows will slow down indexing if you work on the console or via RDP on the server Desktop
      • You will see the message INDEXING COMPLETED once all files have been index
        • this can take many days – don’t be surprised and be patient
  • think about monitoring the index and the partition the index resides on

One challenge resides – if your indexing drive becomes full, Windows Search indexing will crash the index database and likely determine it as corrupt and start from scratch. This can happen within minutes, even before any of your monitoring solutions might warn you about the full drive. There are eventlog entries about and you would easily see that the number of indexed files dropped to a very low number again. The drive becomes suddenly pretty empty as well again. This is sure one of the downsides of how Microsoft implemented this, but if you provide plenty of space in the first place, you likely won’t experience this issue.

iFilters for PDF files seem not to be necessary on current Windows versions. In the past I downloaded a iFilter for PDF files from Adobe but I experienced many issues with temporary files on the C:\ of my file servers. This is a known bug with the Adobe iFilter – as for Windows 2016 those files are full text index, but the same restrictions as in the past apply – PDF file can hold editable text that can be indexed or they hold pictures – what is often due to scans of documents – as long your scanner didn’t due OCR and translate the image to text, those files can’t be full text indexed.
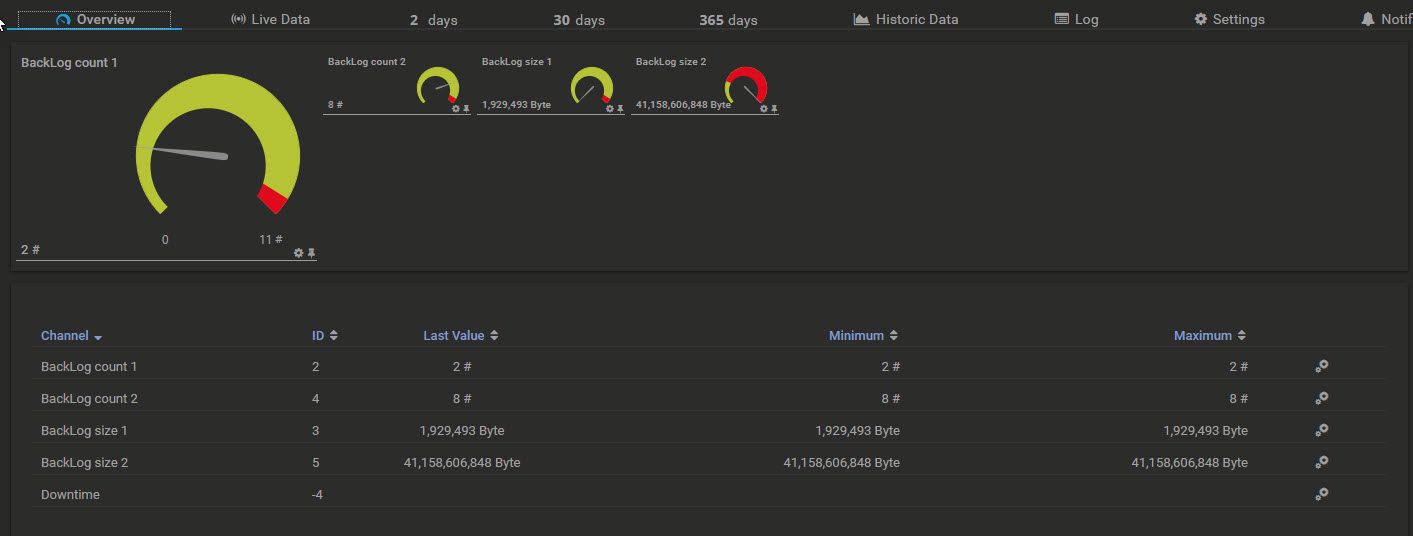
Monitoring

It is almost essential to have proper monitoring in place for this. Actually, you want to monitor everything within your network, but that’s another story. I faced the same challenges and even was able to find out more about how the index database grows and why many people aren’t happy with it. Eventually it comes down to improper configurations and bad or nor monitoring at all. I highly recommend you have a look at this additional blog article about Windows Index Monitoring.

The advantage of DFS and how to set up a working structure

The advantage of DFS and how to set up a working structure

File shares are something every IT professional will work with. Many companies have way to complicated and unstructured network file systems with to deep permissions, to many shares and access points, often several connected drives and from an IT perspective nightmares when it comes to migrating to newer servers or having satellite offices and subsidiaries gaining access to it especially on lower speed connections.

Having been in IT for about 20 years by now, I saw a lot and was challenged with it quite a bit. One of the best solutions I came across is the one I am about to show you here. It is very structured while giving you the advantage of leveraging it as you need and go and should allow you to use it in most businesses.

First of all – please note that I will not go as far as explaining and exploring the differences with Active Directory integrated and Stand-A-Lone namespaces. If by any means possible, I suggest you use Active Directory integrated namespaces to simplify the roll out, but both would work.

The structure example:

The structure example will depend on a DFS Root server and a separate File-Server per root-folder on the later network drive. This is just an example, you do not need to split it all up, thought if you can do it to keep it as structured as possible

Example target file system structure:

  • N:\
    • N:\Archive
      • N:\Archive\John Doe
      • N:\Archive\Jane Doe
    • N:\Departments
      • N:\Departments\Marketing
        • General
        • Mangement
        • Public (anyone has read access)
      • N:\Departments\Accounting
        • General
        • Mangement
        • Public (anyone has read access)
    • N:\Other
      • N:\Other\Manufacturing
      • N:\Other\Projects

The declared goal is to keep the NTFS rights structure as simple as possible and not going any deeper then e.g. level three – e.g. N:\Departments\Marketing\General

Each department folder in this example will have a public folder where a member of the department has read/write access while any non-marketing member has read access to files that are published there.

The archive tree is for terminated employees and archive data. Their information gets collected in a sub-folder in this tree, a group will be created for each of those folders and only people that got approval to access this data will see and be able to read those archived files (read-only is recommended as NTFS permission)

The file servers and their preparation:

DFS Root-Server
  • create a folder on the data-partition like D:\DFSRoots – there will not be any real data in this folder – but it will hold the actual DFS structure
    • create sub folders for the branches on the shared DFS drive like:
      • D:\DFSRoots\Departments
      • D:\DFSRoots\Archive
      • D:\DFSRoots\Other
DFS Department Server
  • create a folder on the data-partition like D:\SharedFolders\Departments
    • remove the everyone or authenticated user groups from this folder – only System and Domain-Admins should have read/write permission here while group N_Departments will have read-only access on this folder.
    • create a sub-folder for each main folder you want to see under the path N:\Departments and share it 
    • add a $ (dollar/string) sign to the share name so it remains hidden a hidden share
    • Examples:
      • D:\SharedFolders\Departments\Marketing
      • D:\SharedFolders\Departments\Accounting
  • now create the following sub-folders for each department folder as shown on the example Marketing
    • D:\SharedFolders\Departments\Marketing\General
    • D:\SharedFolders\Departments\Marketing\Management
    • D:\SharedFolders\Departments\Marketing\Public
  • create two groups in Active Directory for Marketing
    • N_Departments_Marketing_General
    • N_Departments_Marketing_Management
  • create a general group N_Departments to use it for all Public folders
  • assign the groups to their according sub-folders General and Management with read/write rights you probably will need to remove the read-access that the group N_Departments inherited from this folder 
  • assign the group N_Departments to the Public folder in all departments with read-only rights (if not inherited)
  • assign the group N_Departments_Marketing_General to the Marketing\Public folder with read/write access – allowing each member of marketing to publish information for access to other people – only marketing can write in this folder, other people only have read-access to it
DFS Archive Server
  • create a folder on the data-partition like D:\SharedFolders\Archive
    • create a sub-folder for each main folder you want to see under the path N:\Archive and share it 
    • add a $ (dollar/string) sign to the share name so it remains hidden a hidden share
    • Examples:
      • D:\SharedFolders\Archive\John Doe
      • D:\SharedFolders\Archive\Jane Doe
DFS Other Server
  • create a folder on the data-partition like D:\SharedFolders\Other
    • create a sub-folder for each main folder you want to see under the path N:\Other and share it 
    • add a $ (dollar/string) sign to the share name so it remains hidden a hidden share
    • Examples:
      • D:\SharedFolders\Other\Manufacturing
      • D:\SharedFolders\Other\Projects

The DFS namespace set up and configuration

  • add the Namespace \\domain.local\N for the N: drive (just an example)
  • add the folders Archive, Departments and Other to the namespace
  • for each of those folders you add the shared sub-folders like indicated in the list below as sub-folders (they will appear on the Namespace tab when you click on the folder in the DFS Management) and set the target to the according file-share on the specific DFS server where the data will reside
    • Departments\Marketing
    • Departments\Accounting
    • Archive\John Doe
    • Archive\Jane Doe
    • Other\Manufacturing
    • Other\Projects
    • This will actually create a shared sub-folder on the DFS Root server for each of those folders in D:\DFSRoot\

Note – information about the above example

The example below is kept simple – I did not go in to each and every right you would need to assign for the sole purpose of keeping it simple and understandable. Please investigate and set the rights as you really need them. 

As for the Archive tree, it might be beneficial to have PowerShell script automate the folder creation, group creating and rights assignment for those NTFS paths, so you limit the possible failure-rate in case you are going to archive terminated employee data and other stuff in this tree branch.

What are the real benefits of this

  • add multiple folder targets for replication
    • replication can be beneficial in a server-migration scenario as well as in a subsidiary scenario
    • you can add replications on the departments-branch example per department folder – not each subsidiary will need a mirror folder of each department, rather then just a few – this decreases the amount of data and load on the connection and size of the server respective it’s disk-space and reduce cost as well
  • a simple rights structure fully based on groups
    • in general you should never ever use a user account to assign any rights – always create a group, whether for a drive-share, NTFS rights or any other purpose. Always create a group!
    • you can add and remove users from those groups
    • you can audit the permissions on the NTFS side rather quick cause they should relate to strong group names
    • the groups can be audited against HR lists of members of the department or by department managers and directors to make sure only people that need to have certain access levels will have them
  • while limiting access to certain folders you limit the amount of damage a possible attack by malware could cause 
  • you can divide or summarize the actual file-servers that hold the data as needed in the long run
  • a simple group design with limited depth permissions is easier to maintain and audit
  • you have one central network drive that you will assign in order to give everyone access – all data will be centrally on this path independent from any file-server host-name. This can be a huge advantage cause some applications might not relate to the mapped drive rather than a UNC path what could cause you major headache when ever you want to migrate/upgrade or retire your file-servers later on
  • possible other file-shares within the corporation in other locations could be made accessible by linking them in as a folder in e.g. the others-namespace avoiding that users would need to know and remember the UNC path and you even allowing them to access any UNC path – it will act like a mapped drive while pointing in the background to an UNC path

There are many more advantages to DFS and the whole design. I hope this gives you a good overview and idea of how to design or re-design your file-server structure and simplify the whole access structure. 

Full text search and DFS drive mappings

This is a challenge that is not easy to overcome. Still, thought there is no official and directly implemented solution from Microsoft for this, I was able develop and provide a solution that will access the Windows Search Index and provide it back to the end user only using standard Windows components. All you need to know and do is described in the IT Search section of this web site.

Monitor DFS replication backlog between servers in PRTG

Monitor DFS replication backlog between servers in PRTG

One of the challenges with DFS is to monitor the DFS replication backlog. There are various scripts out there to accomplish this. Unfortunately I found nothing I really liked and giving me the simple insight I wanted.

The goal was simple – a script that will monitor the backlog between two systems in both directions – meaning Server-A to Server-B and Server-B to Server-A. For both directions I wanted to see the amount of files as well as the size of those files. I did not care about what DFS groups and or DFS folders are affected in detail – this is because the amount of groups might change, the amount of folders will likely change rather frequently, meaning it would be a challenge to monitor it per group or even on a folder level very efficient. Monitoring the amounts of groups and folders alone has no really advantage, cause this would have been changed by an administrator.

Below you will find my script that actually expects three parameter – the two server names and a limit integer value. The limit will not influence the XML response of the script, you could add the <text>$Response</text> and <text>$Response2</text> tags in lines 77 and 79 after the </unit> and before the </result> tag if you want, I removed them currently.

See the picture below as an example of how the result looks like in PRTG.

Create the following script in C:\Program Files (x86)\PRTG Network Monitor\Custom Sensors\EXEXML and make sure you have the C:\Windows\system32\WindowsPowerShell\v1.0\Modules\Dfsr\ and the C:\Windows\SysWow64\WindowsPowerShell\v1.0\Modules\Dfsr\ folders – you might need to copy them over. If you miss them at all, you might need to add the needed Windows Roles/Features or install the RSAT (Remote Server Administration Tools) on your system.