#make sure the executing user and system has those two commands run
#Find-Module -Name VMware.PowerCLI
#Install-Module -Name VMware.PowerCLI
#useful command
#Set-PowerCLIConfiguration -Scope User -ParticipateInCEIP:$false -confirm:$false
#Set-PowerCLIConfiguration -InvalidCertificateAction ignore -confirm:$false
#
#alternative look here: https://blogs.vmware.com/PowerCLI/2017/04/powercli-install-process-powershell-gallery.html
param(
[string] $VCenterServer = "",
[string] $DomainAndUser = "",
[string] $Password = ""
)
Import-Module VMware.PowerCLI
#avoid unecessary output
Set-PowerCLIConfiguration -Scope User -ParticipateInCEIP:$false -confirm:$false
#avoid certificate issues
Set-PowerCLIConfiguration -InvalidCertificateAction ignore -confirm:$false
Connect-VIServer $VCenterServer -username "$DomainAndUser" -Password "$Password"
$colAlarms = (Get-DataCenter).ExtensionData.TriggeredAlarmState
$XML = "<PRTG>"
[int] $Warnings = 0
[int] $WarningsAck = 0
[int] $Alerts = 0
[int] $AlertsAck = 0
[int] $OverallStatus = 0 #default green
if ($colAlarms.Count -gt 0) {
foreach ($entry in $colAlarms) {
if ($entry.OverallStatus -eq "yellow") {
$Warnings += 1
if ($entry.Acknowledged) {
$WarningsAck =+ 1
} else { #we only increase the overall status if this alert is not acknowledged
if ($OverallStatus -lt 1)
{
$OverallStatus = 1
}
}
} elseif ($entry.OverallStatus -eq "red") {
$Alerts += 1
if ($entry.Acknowledged) {
$AlertsAck =+ 1
} else { #we only increase the overall status if this alert is not acknowledged
if ($OverallStatus -lt 2)
{
$OverallStatus = 2
}
}
}
}
}
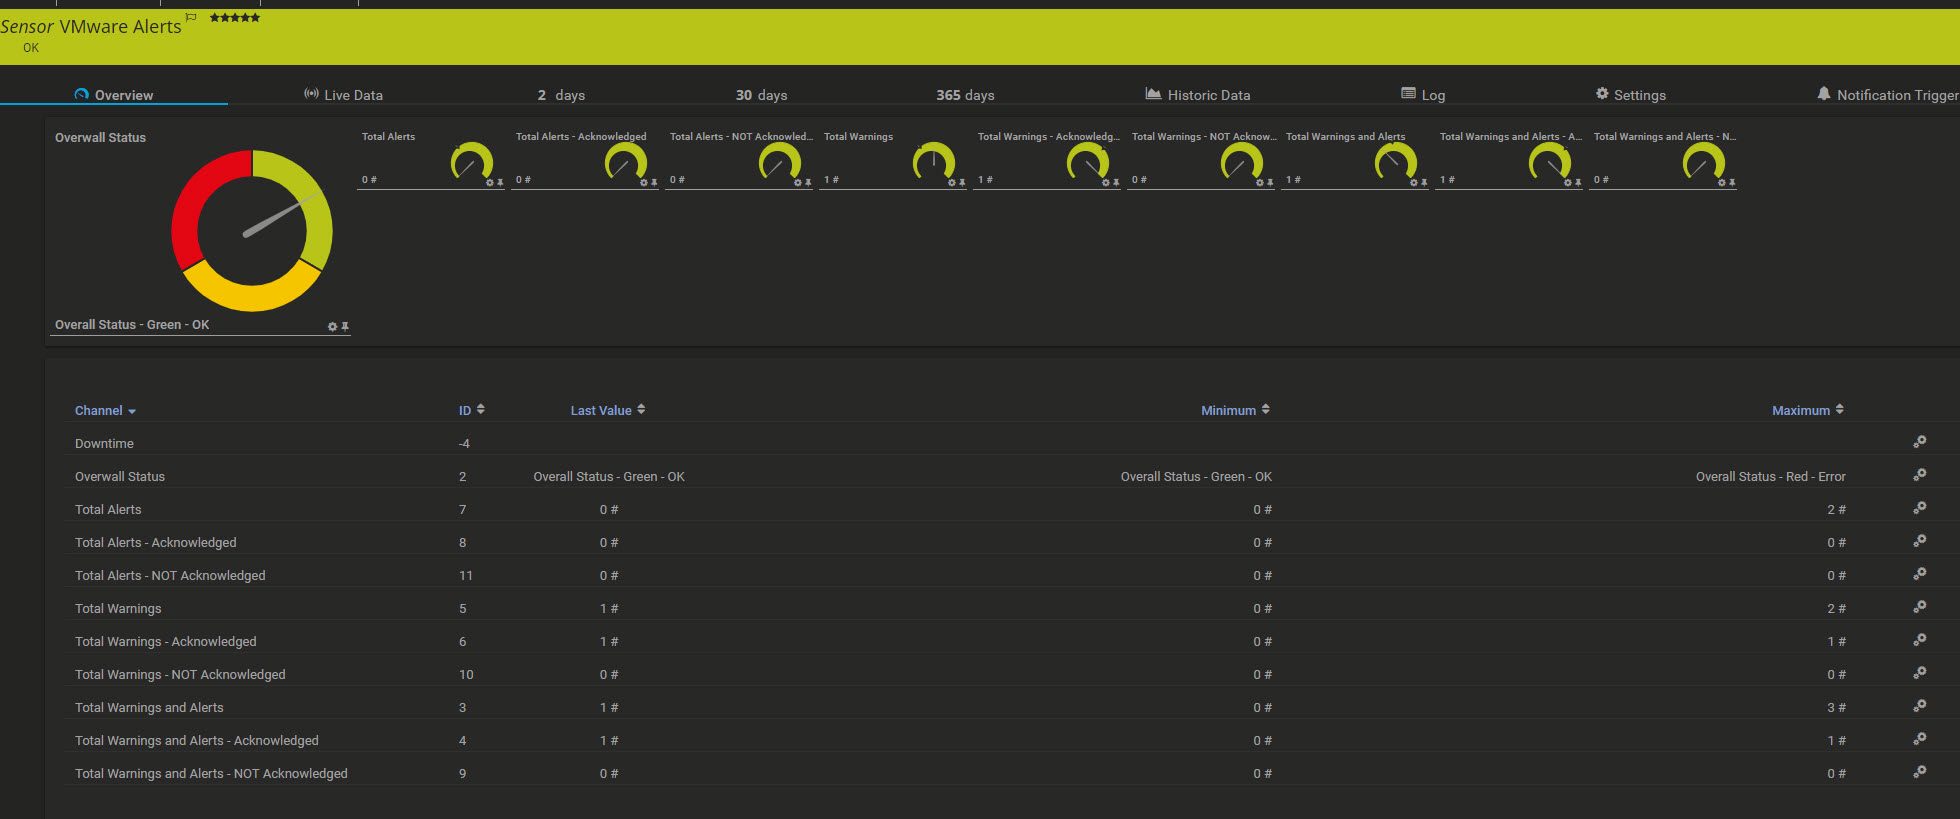
$XML += "<result><channel>Overwall Status</channel><value>" + $OverallStatus + "</value><ValueLookup>vmware.alerts.search</ValueLookup></result>"
$XML += "<result><channel>Total Warnings and Alerts</channel><value>" + $colAlarms.Count + "</value><CustomUnit>#</CustomUnit></result>"
$XML += "<result><channel>Total Warnings and Alerts - NOT Acknowledged</channel><value>" + ($colAlarms.Count - $WarningsAck + $AlertsAck) + "</value><CustomUnit>#</CustomUnit></result>"
$XML += "<result><channel>Total Warnings and Alerts - Acknowledged</channel><value>" + ($WarningsAck + $AlertsAck) + "</value><CustomUnit>#</CustomUnit></result>"
$XML += "<result><channel>Total Warnings</channel><value>" + $Warnings + "</value><CustomUnit>#</CustomUnit></result>"
$XML += "<result><channel>Total Warnings - NOT Acknowledged</channel><value>" + ($Warnings - $WarningsAck) + "</value><CustomUnit>#</CustomUnit></result>"
$XML += "<result><channel>Total Warnings - Acknowledged</channel><value>" + $WarningsAck + "</value><CustomUnit>#</CustomUnit></result>"
$XML += "<result><channel>Total Alerts</channel><value>" + $Alerts + "</value><CustomUnit>#</CustomUnit></result>"
$XML += "<result><channel>Total Alerts - NOT Acknowledged</channel><value>" + ($Alerts - $AlertsAck) + "</value><CustomUnit>#</CustomUnit></result>"
$XML += "<result><channel>Total Alerts - Acknowledged</channel><value>" + $AlertsAck + "</value><CustomUnit>#</CustomUnit></result>"
$XML += "</PRTG>"
Function WriteXmlToScreen ([xml]$xml) #just to make it clean XML code...
{
$StringWriter = New-Object System.IO.StringWriter;
$XmlWriter = New-Object System.Xml.XmlTextWriter $StringWriter;
$XmlWriter.Formatting = "indented";
$xml.WriteTo($XmlWriter);
$XmlWriter.Flush();
$StringWriter.Flush();
Write-Output $StringWriter.ToString();
}
#Clear
WriteXmlToScreen "$XML"