 Checklists are one of the most complex modules of the whole IT Assets Management Database / CMDB and at the same time one of the most useful and powerful for any IT department.
The purpose of Checklists
Standardization, defined processes, automation to some extent, documentation and traceability are all properties of Checklists.
There are many processes in IT that are repetitive and daily tasks like:
- new hires / onboarding of employees
- terminations / offboarding of employees
- imaging new computer / workstations / PC build
- deploying workstations / computer to employees
- retiring assets
- installing servers / server build
- retiring servers
- creating new DFS shares – see Matrix entries
- removing DFS shares
- assigning Office 365 licenses to employees
- updating employee information
- printer deployment
- printer retirement
- reserve IP addresses on the DHCP server
- remove IP reservations from the DHCP server
- employees going on LOA / Leaf of Absence and returning
- deploying phone extensions and removing them
This list could go on for quite a while – think about all the processes you have in place, all the tasks you repeat and possibly have standardized in one way or another.
A Checklist defines itself by the steps you need to execute, this can include CMDB internal database queries and even executing scripts that will automate parts of the steps included, where possible, like Active Directory adjustments or DHCP reservations.
How it works
First you create a Checklist Template, this template holds all the steps needed to execute a certain task. These steps can be sorted as well as moved in to make them appear as sub-step/tasks on the Checklist.
You can put in simple instructions or add more complex steps that require a text-input, selection from a drop-down list, make a link available or even execute a script / PowerShell script that can automatically grab information from the source database record, other tables and/or other Checklist input fields like from the drop-down field or textbox from any step on your Checklist.
You can make steps mandatory or optional. Mandatory fields need to be completed, while optional can be marked as not executed.
These Checklist Templates are attached to various IT Asset Management Database / CMDB items like Servers, Infrastructure Assets, Other Assets, Workstations, Employees, Printers, Responsibility Matrix, LDAP Groups and Phones/DIDs. You also can determine if finishing a Checklist automatically changes the deployment status of the related database / asset entry.
An application user selects the asset / database entry he/she is working on, goes to Checklists and selects from the available Checklist Templates. While clicking on create Checklist, a copy of the current Checklist Template will be created and shown. This also means, you can alter the Template, but any already created Checklists will remain as they had been when created from the Template, they won’t be altered while the Template is adjusted.
The user now goes through the steps that you indicated on the Checklist, can click the links to reach e.g., web-portals, write additional information in the text fields, select values from drop-down lists and execute scripts.
Once he/she thinks they are done, they can click on Finish – this will cause a validation of the Checklist and make sure every required field was filled and marked completed.
If the Checklist cannot be finished right away, the user can click on save as draft, what saves the current status of the Checklist so it can be worked on later.
Completed Checklists can only be re-opened by a user with appropriate rights, see settings.
Any checkbox, textbox, link, drop-down field and script button has further tracked information on it. You can hover over each off them to see when it was clicked and by whom.
A finished Checklist can be viewed in a read-only mode for reference and review.
How to work with Checklist Templates
Create a new Checklist Template and define which target asset type you want to attach it to. You do not need to define a new deployment status, this is optional.
Now you need to create line items. They can be very simple, but they can also be very complex down to SQL queries and script execution.
If you want to engage scripts, like PowerShell scripts, make sure every Checklist executer will have access to the script path. A central folder proved most efficient, while at this point it needs to be mentioned that for some tasks e.g., Active Directory operations, you might need to use a different user as the script needs to be executed in an elevated mode. If this is the case, make sure these user accounts have access to this path as well. You can control this elevation method in the Application Settings.
- Active – simply defines if this line item will be shown or not
- Sort Order – recommendation is to use 100 increments, this way you can easily insert items in between later on down the road
- Sub Level – 0 means no increment from the left, each higher number increments the item space from the left a bit more
- Mandatory – defines if this item MUST be executed, including checks for if there was text entered or an item selected
- Has Checkbox – some items might just be category titles, nothing to be executed, you can remove the checkbox for these
- Entry Name – short title of the Checklist bullet
- Memo – long description of what is expected to be done, to use line feeds etc. it is recommended to type the text in a simple text editor, might be easier, it might line break depending on the screen size as well
- Link – any URL that the user might need to reach to execute the task or has further information e.g., to a Wiki article etc.
- Textbox
- Has Textbox – check if you want to display a textbox to enter text
- Input Field Size – how many lines the textbox should be, height
- Textbox Target Field – this is optional! click on the magnifying glass in the next column select target field, this will show a list from the target asset type table – select any of the fields to have the Checklist write the textbox entry back to this field. Leave blank if no write back is needed.
- Input Script Reference – this is optional! if you want to reference this textbox as parameter in a script on this Checklist, you need to give it an alias here, otherwise leave blank
- Drop-down lists
- List Type – you can choose from two types of lists
- Table/Query – pre-defined or manual SQL query
- Value List – manual list entries you define
- List Context – select one of the pre-defined SQL queries, requires Table/Query
- List Source – if no List Context was selected and Table/Query is selected, you need to enter a SQL SELECT statement here. You can click on the SQL query builder button in the next column to support you with this and test your SQL statement. This can be a complex task. You will need to have some basic understanding on SQL queries in order to be successful. If you have questions, it is highly recommended to use the contact form. If you selected Value List enter coma separated values here. You can engage multiple columns, see List Columns as well for this.
- List Columns – this defines how many columns should be in your drop-down field table
- List Column Widths – you can make them invisible with 0 or give them a width, comma separated values
- List Limit to List – defines if the user can write manual items or if he needs to choose an entry from the list
- List Target Field – this is optional! click on the magnifying glass in the next column select target field, this will show a list from the target asset type table – select any of the fields to have the checklist write the select list entry column 0 back to this field. Leave blank if no write back is needed.
- List Reference – this is optional! if you want to reference this drop-down list as parameter in a script on this Checklist, you need to give it an alias here, otherwise leave blank, any column can be used as a parameter
- List Type – you can choose from two types of lists
- Scripts
- Script Type – cmd / DOS or ps1 / PowerShell
- Script – this is a more complex topic, see further below for details and samples
- Run Script Elevated – determines if the elevation settings from the application settings need to be applied and the script will be executed under a different Windows user
- Alternative Script Source – scripts don’t need to rely on the table the checklist asset type comes from, you can select another SQL query but be aware, there needs to be a field ID on which the results will be filtered automatically depending on the record id of the source asset, the column button next to it helps you selecting an alternate source and testing it – without the ID filtering, though
Scripts explained
Scripts are one of the most powerful parts of the Checklists system. The idea is to automate steps as much as possible, while even relying on data from the Asset Management Database / CMDB. The actual user / person that executes the Checklist will only press a button and the script will start – of course the script can pull various information from the database as well as being able to engage directly with the user – this all depends on what you want to do and archive.
Nowadays most things can be scripted, Microsoft RSAT / Remote Administrations Tools, Microsoft Office 365 and VMware PowerCLI are just two famous examples of toolsets you can engage. About anything that has an API can somehow be engaged by scripts. This goes as far as using e.g., REST API from third party software like Pleasant Password Server, that you can engage to retrieve passwords for e.g., Computers, save them in the Asset Management Database as a Note and delete the entry from the password server, that has been originally generated by the automated domain join script in my blog.
Scripts and Parameters
First of all – any script path must be accessible by the person that will execute the Checklist. A central network path as UNC path is highly recommended. Best is to go to the Windows Explorer, locate the script, hold down SHIFT and right click on it, now you will see “Copy as Path” what will copy the full path to the script in text-quotes.
Text-Quotes around the script-path and script-name are highly recommended or actually a must. Sample:
“\\server\share\folder one\folder two\scriptname.ps1”
Each Parameter value should also be in text-quotes if they could include spaces – what ends up in lines like this:
“C:\IT Assets\ChecklistScripts\Employee_UpdateAll.ps1” [!username!] [!checklist_empNumber!] [!checklist_dept.1!] “[!checklist_dept.2!]” “[!checklist_title!]” [!checklist_phone!] [!checklist_mgr.0!]
If you look closely, you will see that some parameter fields are in text-quotes and others aren’t. This all depends on if you risk having a space symbol within the value or not. If in doubt, add always test-quotes.
Referencing data from the database entry
You can reference any column from the current CMDB Asset Management Database entry this Checklist is attached too. The simplest examples might be username and hostname below.
- [!FIELD!]
- The word FIELD needs be replaced by the actual field in the table to what this checklist is attached too.
- [!username!] can be used for Employees to receive their LDAP username and execute the current script against this user, respectively providing the username automatically to the script as parameter.
- [!hostname!] can be used for Workstations/Computers to receive hostname set in the database, and execute the current script against this user, respectively providing the username automatically to the script as parameter.
Alternative script source data
In some cases, you might need to pull data from another table or even a special view that you might have created on your own, instead of relying solely on the source table the Checklist is attached too.
You actually can provide an alternative source to the script and use that instead for direct field references from database entries. The Checklist will still filter on the value “ID=#” meaning the field ID must hold the same number as the original source table. E.g., tblWorkstations.ID (record ID) entry 46 is the one you opened a Checklist on, your alternative view will be filtered on WHERE ID = 46.
You would do something like this:
1 | SELECT tblWorkstations.ID, tblEmployees.username FROM tblWorkstations LEFT JOIN tblEmployees ON tblWorkstations.EmployeeID = tblEmployees.ID |
You could now reference the column [!username!] as parameter for your script.
Referencing text fields as parameter source
Any text-input field can be referenced as input source field. In order to do so, you need to set a reference tag parameter (Input Script reference) on the Checklist entry first.
- [!checklist_TAG!]
- TAG is to be replaced by the input script reference parameter set for this specific text-field
- [!checklist_phone!] if you have PHONE as input script reference set on a text-input field, you will receive the value entered in this field with this parameter.
Drop down list columns as parameter source
You can reference specific columns of columns from drop-down list fields within your checklist. Set a reference tag (List Reference) on these and keep in mind columns start 0 based, meaning the first column is 0, the second is 1 and so on.
The sample below assumes you have a list referenced with the word CHKDEPT in the List-Reference field.
- [!checklist_TAG.#!]
- TAG is to be replaced by the list reference tag used by the anticipated list
- # is to be replaced by the number of the column you want to receive data from
- [!checklist_CHKDEPT.0!] this gives you the ID column value
- [!checklist_CHKDEPT.1!] this gives you the department name column value
- [!checklist_CHKDEPT.2!] this gives you the department number column value
Sample Scripts
Belowe you will find a few sample scripts. You might need to adjust them to your specific needs and environment. Feel free to use the contact form if you have specific questions.
DHCP reservations
This script will create DHCP reservations while pulling the MAC address and IP address from an alternative script source view in the database. This sample will work on the entry type Server.
Create this SQL server view in the database, name it e.g., qryCheckListScriptServerMACIP (this view exists already and can be used for SERVERS, INFRASTRUCTURE and OTHER assets, as well as one for PRINTERS: qryCheckListScriptPrinterMACIP). This view will pull all defined server IP addresses including the manually set MAC address that is also referenced in the IP reference. The view will be your alternative script source.
1 2 3 4 5 6 7 8 | SELECT S.ID, I.IPAddress, M.MACAddress, S.Hostname, S.Domain, V.IPNotation FROM dbo.tblServers AS S RIGHT OUTER JOIN dbo.tblServerMACs AS M ON S.ID = M.ServerID RIGHT OUTER JOIN dbo.tblIPAddressesReferences AS R ON R.ForeignID = S.ID AND R.ForeignMACID = M.ID RIGHT OUTER JOIN dbo.tblIPAddresses AS I ON I.ID = R.IPaddressID RIGHT OUTER JOIN dbo.tblIPVLANs AS V ON V.ID = I.VLANID WHERE (S.ID IS NOT NULL) AND (R.ForeignTable LIKE 'tblServers') GROUP BY S.ID, I.IPAddress, M.MACAddress, S.Hostname, S.Domain, V.IPNotation |
In order to the same for e.g., Workstations, you will need to add another view and adjust the tblWorkstations accordingly.
Next create the following PowerShell script in your central script folder
1 2 3 4 5 6 7 8 9 10 11 12 13 14 15 16 17 18 19 20 21 22 23 24 25 26 27 28 29 30 31 32 33 34 35 36 37 38 39 40 41 42 43 44 45 46 47 48 49 50 51 52 53 54 55 56 57 58 59 60 61 62 63 64 65 66 67 68 69 70 71 72 73 74 75 76 77 78 79 80 81 82 83 84 85 86 87 88 89 90 91 92 93 94 95 96 97 98 99 100 101 102 103 104 105 106 107 108 109 110 111 112 113 114 115 116 117 118 119 120 121 122 123 124 125 126 127 128 129 130 131 132 133 134 135 136 137 | param( [string] $HostName = "", [string] $DomainName = "", [string] $MACAddress = "", [string] $IPAddress = "", [string] $IPscope = "" ) $DHCPServer = "yourDHCPserver.domain.local" $CIMSession = New-CimSession -ComputerName $DHCPServer function Check-IPaddress([string]$IP){ [ref]$ValidIP = [ipaddress]::None If ([ipaddress]::TryParse($IP,$ValidIP)) { return $true } Else { return $false } } Write-Host "Script starting..." Write-Host "" Write-Host "Parameters submitted to script:" Write-Host "===============================" Write-Host "Host-Name: $HostName" Write-Host "Domain-Name: $DomainName" Write-Host "MAC Address: $MACAddress" Write-Host "IP Address: $IPAddress" Write-Host "IP scope: $IPscope" Write-Host "" $MACAddress = $MACAddress.Replace(".",""); $MACAddress = $MACAddress.Replace("-",""); $MACAddress = $MACAddress.Replace(":",""); $MACAddress = $MACAddress.Replace(" ",""); $MACAddress = $MACAddress.Trim(); If ($MACAddress.Length -eq 12) { #Re-Formatting MAC to correct format (dashed) $NewMAC; $cnt = 0; $UseDash = $false; foreach($char in [char[]]$MACAddress) { $cnt += 1; If ($cnt -eq 12) { $NewMAC += $char; } Else { If ($UseDash -eq $false) { $UseDash = $true; $NewMAC += $char; } Else { $UseDash = $false; $NewMAC += $char + "-"; } } } If (Check-IPaddress($IPAddress) -eq $true) { $NewIPscope = $IPscope.Split("/")[0] If (Check-IPaddress($NewIPscope) -eq $true) { $NewReservationName = "$HostName" If ($DomainName.Length -gt 0) { $NewReservationName += ".$DomainName" } If ($NewReservationName.Length -gt 0) { Write-Host "" Write-Host "" Write-Host "check DHCP server ($DHCPServer) for existing reservations on this IP address..." Try { $ExistingReserverations = Get-DhcpServerv4Reservation -ComputerName $DHCPServer -IPAddress $IPAddress -CimSession $CIMSession -ErrorAction Stop $foundReservation = $true } Catch { $foundReservation = $false $Error.Clear() } If ($foundReservation -eq $true){ Write-Host "" Write-Host "" Write-Host "The following reservation exists on the DHCP server for the defined IP - remove this first!" -ForegroundColor Red Write-Host "===========================================================================================" $ExistingReserverations Write-Host "" Write-Host "" $Readhost = Read-Host "Remove this reservation? (y/n)" Switch ($ReadHost) { Y { Try { Remove-DhcpServerv4Reservation -ComputerName $DHCPServer -IPAddress $IPAddress -CimSession $CIMSession $foundReservation = $false } Catch { Write-Host "Couldn't remove the reservation..." -ForegroundColor Red } } Default {} } } If ($foundReservation -eq $true){ Write-Host "Cant' proceed.. the existing reservation needs to be removed first..." -ForegroundColor Red } Else { Write-Host "" Write-Host "" Write-Host "Transformed parameters for DHCP reservation:" -BackgroundColor DarkBlue Write-Host "============================================" -BackgroundColor DarkBlue Write-Host "Correct formatted MAC: $NewMAC" -BackgroundColor DarkBlue Write-Host "Foramtted Reservation Name: $NewReservationName" -BackgroundColor DarkBlue Write-Host "IP address: $IPAddress" -BackgroundColor DarkBlue Write-Host "IP scope: $NewIPscope" -BackgroundColor DarkBlue Write-Host "" Write-Host "" Read-Host -Prompt "Press any key/enter to continue or CTRL+C to quit" Write-Host "" Write-Host "" Write-Host "Attempting to add DHCP reservation..." Add-DhcpServerv4Reservation -ComputerName $DHCPServer -ScopeId $NewIPscope -IPAddress $IPAddress -ClientId $NewMAC -Description $NewReservationName -Name $NewReservationName -CimSession $CIMSession Write-Host "" Write-Host "" Write-Host "Attempt to add DHCP finished - reservation check results:" Get-DhcpServerv4Reservation -ComputerName $DHCPServer -IPAddress $IPAddress -CimSession $CIMSession Write-Host "" Write-Host "" } } Else { Write-Host "No hostname / domain name detected" -ForegroundColor Red } } Else { Write-Host "IP scope definition is invalid - exiting script" -ForegroundColor Red } } Else { Write-Host "IP Address is invalid - exiting script" -ForegroundColor Red } } Else { Write-Host "MAC Address malformatted: $MACAddress - exiting script" -ForegroundColor Red } Remove-CimSession -Id $CIMSession.Id Write-Host "Script finished..." |
Fun fact – you don’t need to create this script for Servers, Workstations and Printers separately, you only need to have various alternative source views in the database for this to work properly.
You could set the DHCP Server as an input parameter to the script as well, the sample here has it set as a value within the script, so adjust this please in the script or make it a parameter.
Add a Checklist entry and set the following values in the respective fields:
- Entry Name
- DHCP reservation
- Memo / Description
- Please make sure you have the MAC address manually recorded for this server and used in the IP reservation within the database before executing this script.
- Script
- PS1
- Script-Type
- “C:\IT Assets\ChecklistScripts\CreateDHCPReservation.ps1″ [!hostname!] [!domain!] [!MACAddress!] [!IPAddress!] [!IPNotation!]
- Alternative Script Source
- qryCheckListScriptServerMACIP
When you now click the button, the script fill executes and guide the user through a DHCP reservation process, while first checking if there is an active reservation on the target IP and allowing the user to overwrite it as well as eventually writing the new reservation to the DHCP server.
All you need the user to prepare is IP reservation for the server in the database and making sure it is related to the manually entered MAC address. If that’s the case, the reservation is only a click of a button away.
Removing DHCP reservations
Retiring systems means it is time to clean up. Now you want to remove any DHCP reservations from your DHCP server, so you make sure it is clean and tidy.
This sample assumes you already implemented the SQL view from the DHCP reservation example above and will be based on this.
Please be aware, this script does not automatically compare any MAC addresses – you can implement this if needed, though.
1 2 3 4 5 6 7 8 9 10 11 12 13 14 15 16 17 18 19 20 21 22 23 24 25 26 27 28 29 30 31 32 33 34 35 36 37 38 39 40 41 42 43 44 45 46 47 48 49 50 51 52 53 54 55 56 57 58 59 60 61 62 63 64 65 66 | param( [string] $IPAddress = "", [string] $IPscope = "" ) $DHCPServer = "yourDHCPserver.domain.local" $CIMSession = New-CimSession -ComputerName $DHCPServer function Check-IPaddress([string]$IP){ [ref]$ValidIP = [ipaddress]::None If ([ipaddress]::TryParse($IP,$ValidIP)) { return $true } Else { return $false } } Write-Host "Script starting..." Write-Host "" Write-Host "Parameters submitted to script:" Write-Host "===============================" Write-Host "IP Address: $IPAddress" Write-Host "IP scope: $IPscope" Write-Host "" $NewIPscope = $IPscope.Split("/")[0] If (Check-IPaddress($NewIPscope) -eq $true) { Write-Host "" Write-Host "" Write-Host "check DHCP server ($DHCPServer) for existing reservations on this IP address..." try { $ExistingReserverations = Get-DhcpServerv4Reservation -ComputerName $DHCPServer -IPAddress $IPAddress -CimSession $CIMSession -ErrorAction Stop $foundReservation = $true } catch { $foundReservation = $false } If ($foundReservation -eq $true){ Write-Host "" Write-Host "" Write-Host "The following reservation exists on the DHCP server for the defined IP" -ForegroundColor Red Write-Host "======================================================================" $ExistingReserverations Write-Host "" Write-Host "" $Readhost = Read-Host "Remove this reservation? (y/n)" Switch ($ReadHost) { Y { Try { Remove-DhcpServerv4Reservation -ComputerName $DHCPServer -IPAddress $IPAddress -CimSession $CIMSession $foundReservation = $false } Catch { Write-Host "Couldn't remove the reservation..." -ForegroundColor Red } } Default {} } } Else { Write-Host "No reservation found on DHCP server ($DHCPServer)" -ForegroundColor Red } } Else { Write-Host "IP scope definition is invalid - exiting script" -ForegroundColor Red } Remove-CimSession -Id $CIMSession.Id Write-Host <a href="https://www.it-admins.com/cmdb/online-manual/research-modules/checklists/">"Script finished..."</a> |
The Checklist entry for this sample would look like this:
- Entry Name
- Remove the DHCP reservation
- Memo / Description
- This will remove the DHCP reservation for the IP address reserved for this system.
- Script
- PS1
- Script-Type
- “C:\IT Assets\ChecklistScripts\RemoveDHCPReservation.ps1” [!IPAddress!] [!IPNotation!]
- Alternative Script Source
- qryCheckListScriptServerMACIP
Remove a server/workstation from Active Directory
This sample script only expects a hostname as parameter, Because of this, it will work with any computer name, whether the source is a server-name or a workstation hostname.
The script can come in handy while retiring systems but also when building systems, making sure there is no existing LDAP / Active Directory entry while you e.g., re-image a workstation.
1 2 3 4 5 6 7 8 | param([string] $HostName = "") Write-Host "Script starting..." Write-Host "Trying to find computer: $HostName" $Computer = GET-ADComputer -Identity $HostName Write-Host "Trying to remove computer: $HostName" Remove-ADComputer -Identity $Computer -Confirm:$false Write-Host "Script finished..." |
- Entry Name
- Delete from Active Direcotry
- Memo / Description
- This will delete the hostname entry from Active Directory.
- Script
- PS1
- Script-Type
- “C:\IT Assets\ChecklistScripts\RemoveWorkstationFromAD.ps1” [!hostname!]
Assigning Office 365 licenses
In most environments a daily task and definitively a part of any onboarding process.
Please be aware, you need to read into this process on the Microsoft site to fully understand it, as license assignment can be sometimes confusing per PowerShell against Office 365.
The script is merely a sample on how you can grab the username and assign an Office 365 license to it.
1 2 3 4 5 6 7 8 9 10 11 12 13 14 15 16 17 18 19 20 21 22 23 24 25 26 27 28 29 30 | Param( [string]$username ) $userUPN="$username@domain.com" try{ Get-AzureADUser -ObjectId $userUPN } catch { Connect-AzureAD } Write-Host "" Write-Host "" Write-Host "Currently assigned licenses for: $userUPN" Get-AzureADUser -objectid $userUPN | Select -ExpandProperty AssignedPlans | Where {$_.CapabilityStatus -eq "Enabled"} | ft Write-Host "" Write-Host "" Set-AzureADUser -ObjectID $userUPN -UsageLocation "US" $planName="OFFICESUBSCRIPTION" Write-Host "Assigning new license $planName to $userUPN" Write-Host "" Write-Host "" $License = New-Object -TypeName Microsoft.Open.AzureAD.Model.AssignedLicense $License.SkuId = (Get-AzureADSubscribedSku | Where-Object -Property SkuPartNumber -Value $planName -EQ).SkuID $LicensesToAssign = New-Object -TypeName Microsoft.Open.AzureAD.Model.AssignedLicenses $LicensesToAssign.AddLicenses = $License Set-AzureADUserLicense -ObjectId $userUPN -AssignedLicenses $LicensesToAssign Write-Host "" Write-Host "" Write-Host "Now currently assigned licenses for: $userUPN" Get-AzureADUser -objectid $userUPN | Select -ExpandProperty AssignedPlans | Where {$_.CapabilityStatus -eq "Enabled"} | ft Write-Host "" Write-Host "" |
Before you ask – yes – you could possibly insert the license information per parameter from a drop-down list if you specify them there or you could make the script more complex and guide the user through various options. This is only a sample of what is possible with Checklists.
- Entry Name
- Assign a Office 365 E3 license
- Memo / Description
- This will assign an Office 365 E3 license to this user. The object needs to exist already in Office 365, if not wait for the next synchronization cycle, approximately 30 minutes.
- Script
- PS1
- Script-Type
- “C:\IT Assets\ChecklistScripts\O365LicenseAssignedment.ps1” [!username!]
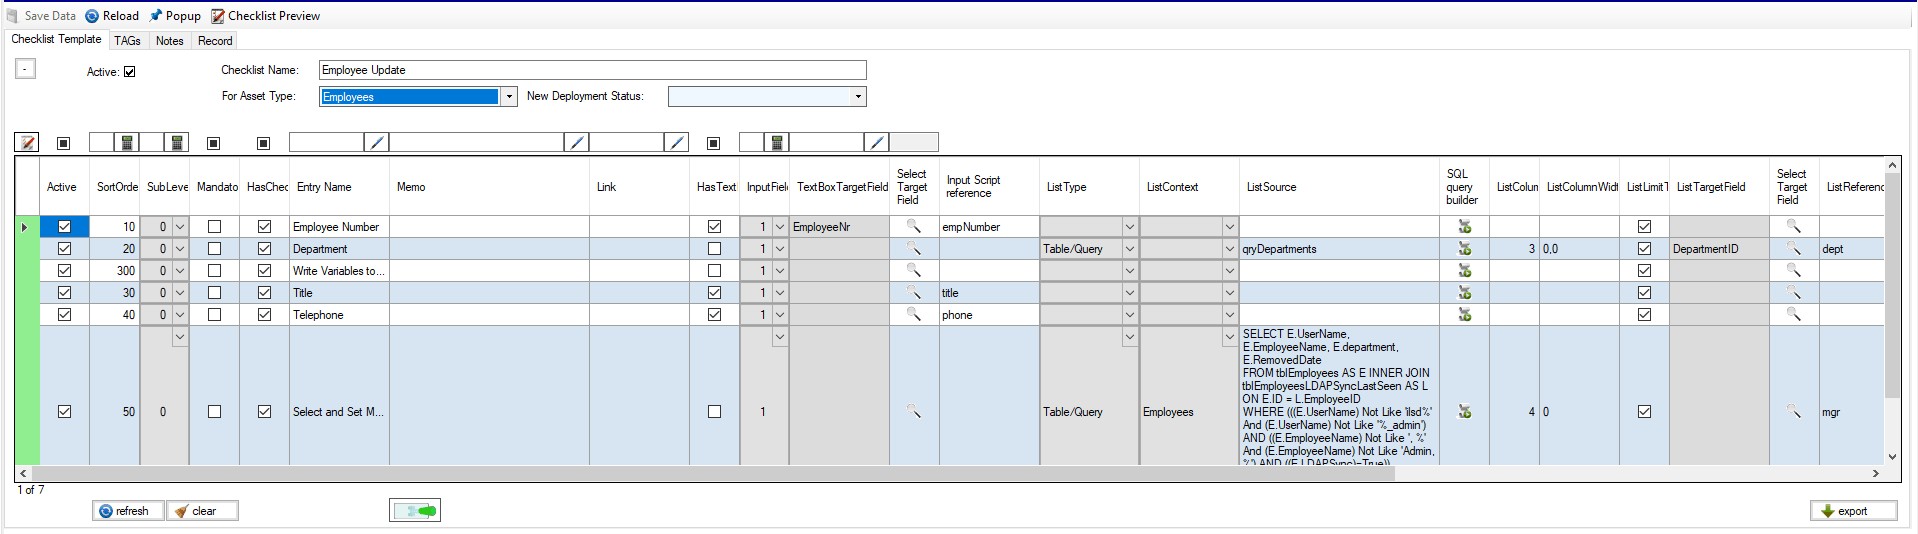
Update and set generic user details / information
This falls under the category onboarding as well as department changes / transfers and e.g., even new name of an employee due to marriage etc. These details have a huge value for your employees, especially in times of Microsoft Teams and Microsoft Outlook, as they reflect in both applications and their use of the Microsoft Active Directory Org Chart capabilities.
1 2 3 4 5 6 7 8 9 10 11 12 13 14 | Param( [string]$username, [string]$empNumber, [string]$departmentNumber, [string]$department, [string]$title, [string]$phone, [string]$manager ) Import-Module ActiveDirectory Set-ADUser $username -streetAddress "your streed" -city "city" -state "state" -postalCode "zip code" -company "company" -Manager $manager -OfficePhone $phone -Department $department -title $title -Replace @{'employeeNumber'="$empNumber";'departmentNumber'="$departmentNumber";'description'="$title";'physicalDeliveryOfficeName'="your office"} Get-ADUser $username -Properties employeeNumber,Department,departmentNumber,Title,Description,OfficePhone,Manager,streetAddress,city,state,postalCode,physicalDeliveryOfficeName,company Add-ADGroupMember -Identity "Company_All Users" -Members $username |
The script expects a lot of parameters, so please be aware that you would need a few more Checklist entries that aren’t mentioned here, e.g., drop-down list fields for their manager and department, or you rely on alternative script-sources for the same.
- Entry Name
- Update the employee details in Active Directory
- Memo / Description
- Make sure you selected a manager and department for this employee before executing this script.
- Script
- PS1
- Script-Type
- “C:\IT Assets\ChecklistScripts\Employee_UpdateAll.ps1” [!username!] [!checklist_empNumber!] [!checklist_dept.1!] “[!checklist_dept.2!]” “[!checklist_title!]” [!checklist_phone!] [!checklist_mgr.0!]