This is something I just came across myself. While deploying an Ubuntu Linux VM the DHCP reservation did not work. This was mixed up with a Windows 2016 DHCP server.
After looking at the wrong DHCP lease I quickly saw an extremely long MAC address and figured that the Linux VM used some kind of randomization for the interface.
IFCONFIG on the system showed the correct hardware MAC address.
It took me a few minutes of research and testing till I found the root cause and rather simple solution.
Linux replaced their NIC handling on many distributions with a newer system called NETPLAN.
I read that a 2019 Windows DHCP would likely handle this correctly, did not have time to test this out. But the following worked for me:
This blog entry will list some registry keys to control computer and user settings via GPO but aren’t available in the standard ADMX GPO templates.
Below you find always the same data format:
Computer Configuration or User Configuration
HIVE
Kay Path
Value Name
Value Type
Value Data
Short explanation
Link if available
Over the years I also always tried to leave a comment in the GPO’s, especially for the Registry Keys, so I could later identify them quickly and possibly even leaving a link so others could read up on these settings and options without doing long research.
Show Drive Letters first in Windows Explorer
This Registry value is set in two areas – Computer Configuration and User Configuration. See both keys below.
This will expand all folders to the current folder in the navigation panel of Windows Explorer, by default it will only navigate to the folder but not expand the path to it in the Navigation Panel. The behavior on this changed back in Windows Vista or Windows 7. This sets it back to a more Windows XP like behavior, what makes it easier to navigate Windows Explorer.
Turns off Windows 10 Fast Startup – meaning a real reboot is done rather then a quick reboot that is actually not a real Windows reboot. A real reboot is slower, but much cleaner.
Office 365 – Update Channel
There is a settings in the Office ADMX files under Microsoft Office 2016 (Machine)/Updates for:
Enable Automatic updates
Update Channel
Update Deadline
Additionally this settings should be set to make sure everything is configured the same and installs the same:
Microsoft released KB5005652 which requires admin rights to install printers, and affects some existing printers that will require an admin to install driver update. Work around is to add the registry key below, which disabled this new security feature.
Value: 0
Allow non-admin users to install Point and Print printer drivers
Value: 1
Blocks non-admin users from installing Point and Print printer drivers. If this registry key does not exist, the default with KB installed will be same as Value 1, blocking non-admins from installing Point and Print printer drivers.
Probably one of the more important security measures you can do, to avoid the standard user browsing other systems on the network to much. It does not really prevent it, but makes it a lot less easy for regular end users, as the network area in Windows Explorer simply vanishes.
Due to a change on how Windows 11 presents the disk sector size, you can have issues with SQL or SQL Express after your upgrade or even on brand new installations.
SQL might just fail to start after an upgrade, with the Event Viewer Application Log Error 1000 similar to the below one:
This is especially true for Samsung SSD 980 – be aware – the SSD 980 Pro does not have this issue, just the SSD 980. There are other OEM versions of it that have the same issue and actually a bunch of other disks.
The root cause is that the devices report the true sector size, what causes SQL to fail. This is still true with SQL Express 2019 – earlier versions as well.
As described in this Microsoft article, you can add a registry key and reboot to make Windows 11 behave like Windows 10 and earlier Windows versions.
Of course, alternative you can either install SQL on another disk drive or replace the drive with one that does not have these compatibility issues.
It remains unclear if there will be updates to this in the future from either Microsoft of the disk vendors like Samsung in the future. For now, this simple registry adjustment fixes the issue.
MeshCentral is a remote support OpenSource platform. It runs on Windows or Linux and needs to be self hosted.
While it supports Let’s Encrypt (letsencrypt.org) certificates, this is not always a possible option. Issues you can run in to are:
port 80 incoming is blocked by your internet provider
your DNS provider does not support the ACME protocol needed
Of course, you also could just simply want to create your own certificate. To do so you go to your regular CA (certificate authority) provider and get your certificate issued. You can do so by simply engaging Windows IIS, request a new certificate per CSR, have it issued and finalize the request in IIS. Your last step is to export it including the private key.
Transfer this file now to your MeshCentral server (just use MeshCentral to transfer the file). Next you will need OpenSSL – what is often pre-installed on Linux and Raspberry, on Windows you will need to download it separately.
OpenSSL is used on the command line to extract the unencrypted key and the separate the certificate so MeshCentral can use it. Follow the next steps – while we assume your source certificate file is named source.pfx.
The newest builds and updates can possibly break some Windows 10 network connections. Saw this specifically in a situation with a SMBv1 drive that was connected via FQDN per GPO.
Windows was not able to connect to the drive, looking at NET USE all you saw was reconnecting.
Connecting to the same share via HOSTNAME and/or IP worked just fine, as well as engaging the UNC path.
The solution to this eventually is a simple registry adjustment, that has to be done in the user-profile HKCU area, so no advanced rights are needed.
Steps:
open REGEDIT
go to HKCU\Network
select the key with the drive-letter you have issues with
add a new REG-DWORD
PROVIDERFLAGS
Decimal 1 or DWORD 00000001
Reboot
Your network drive should work normal again.
Background and Explanation:
The PROVIDERFLAGS instruct Windows to reconnect the SMBv1 network drive, more or less. It eventually did not matter if it was connected per FQDN, IP or HOSTNAME – is was the reconnect that the GPO implied, respective the NET USE /PERSISENTENT:YES switch. If you would use a script – netlogon script – you could just determine the drive as /PERSISTENT:NO and not see the issue either as well as solve it.
Eventually this is specific to SMBv1 and I can’t warn enough about the security risks this protocol has. Still – there are here and there systems that still need to stick around – hopefully secured by firewalls and even sandboxes etc..
ActiveDirectory, respective LDAP, has a result limit setting, MaxPageSize. Those are set by default to 1000 rows per query.
This is primarily important if you use some kind of programming language to get results from LDAP, this code must compensate those limits and engage paging.
Your LDAP query does not need to provide the limit, only the code needs to do the paging as you always just get the max. amount of results set in the current settings.
In order to check your settings do the following commands in a command prompt / cmd window:
MS DOS
1
2
3
4
5
6
ntdsutil
ldappolicies
connections
connecttodomainYOURDOMAIN.LOCAL
quit
showvalues
In theory you could set different values now as well, assuming you have the permission level to do so. But this is not recommended and you should engage paging instead, as you otherwise risk to overload your DCs – even if your commands won’t cause it, a possibly DoS attack could happen – malicious or not, so leave the limits, but be aware of them.
Windows 10 offers various ways to logon to your device. All of them have their pro’s and con’s. One thing is for sure, Microsoft loves the Windows Hello PIN. Even on an Active Directory Domain joined system – if you want to e.g. set up a Finger-Print login, you will be forced to generate a Windows Hello PIN, at least by default.
Funnily it can happen that you don’t even have the option to reset the PIN. What if the user forgot his PIN? No big deal? Well… it actually is a big deal. By default Windows goes back to the PIN if the Finger-Print reader does not work, what is especially common with the Microsoft Surface Keyboards, sure you can rip them off and re-attach to make it work again, but still your user-base / employee-base will say it asks for a PIN and I forgot it..
Fingerprints and PINs are stored locally on the device, in a secured vault. You can’t really alter it, but you can remove it.
In order to remove all locally stored PINs and possibly even Finger-Prints, you must delete all contents of %windir%\ServiceProfiles\LocalService\AppData\Local\Microsoft\NGC.
The quickest way to accomplish this is using the two following commands in an elevated Command Prompt / CMD (run as administrator).
The first one will take ownership of the folder, the second one then will grant administrators rights to it.
Once this is done, you need to delete all contents of the folder. If you are logged on as an administrator you can just use Windows Explorer. If you are logged on as a regular user, you need to do it either more manual in CMD or use e.g. a tool like 7-zip in elevated mode and navigate to the folder, be aware that 7-zip might not be able to handle %windir%, either navigate manually to the folder or use C:\Windows\ServiceProfiles\LocalService\AppData\Local\Microsoft\NGC to get to the path. Delete all contents.
Reboot.
This sledgehammer method will delete all stored PINs and other information for all accounts known by the device. They will need to logon with their Active Directory password and start from scratch. You might also need to click on e.g. REMOVE in the Finger-Print configuration to start over.
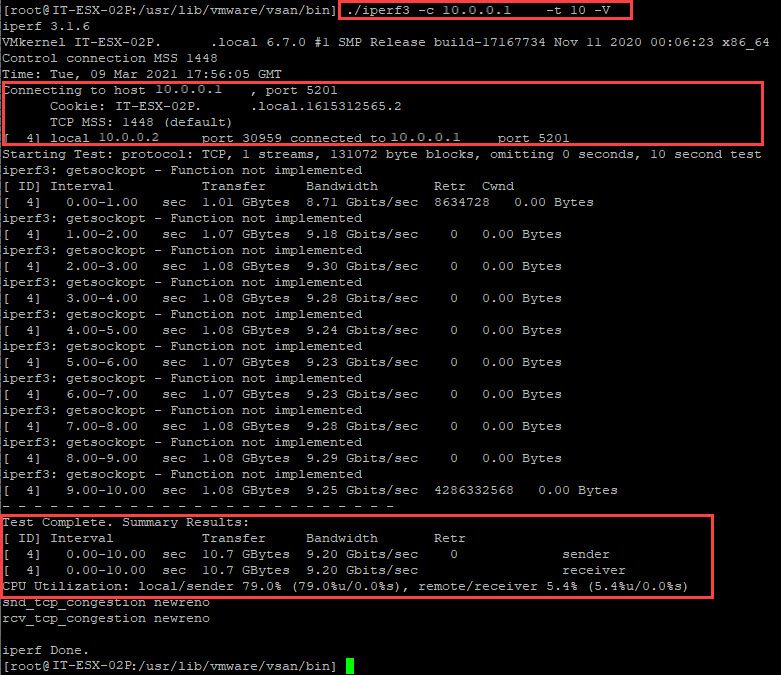
Ever needed to run speed-tests between your VMware hosts? There is an CLI command iperf3 for this.
This command runs as a server and client command. One host will be the server and the other the client. There is further the possibility that some storage vendors even support the iperf3 command.
Example scenario with two VMware ESX hosts:
IT-ESX-01P – will act as server
IP: 10.0.0.1
IT-ESX-02P – will act as client
IP: 10.0.0.2
Steps and commands to execute the network speed test:
Enable SSH on both hosts and connect with e.g. Putty to it, logon as well.
IT-ESX-01P will act as our server
disable the firewall
esxcli network firewall set –enabled false
The ESX firewall needs to be disabled temporarily to execute the tests – on client and server
List the kernel network IP addresses
esxcli network ip interface ipv4 get
choose the interface IP that is on the network you want to test, only kernel-IPs will work
go to the directory that holds the iperf3 command
cd /usr/lib/vmware/vsan/bin
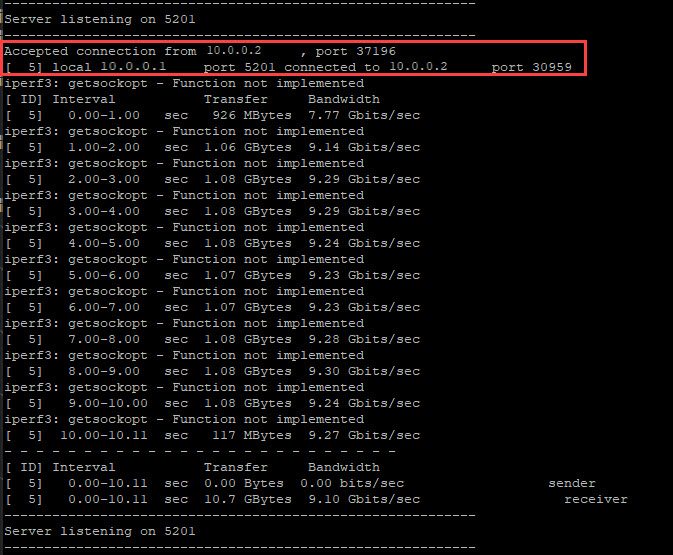
start the iperf server on this host on the kernel IP you need it on
./iperf3.copy -s -B 10.0.0.1
this command starts the server respective listener on the host on the specified IP address
IT-ESX-02P will act as our client
disable the firewall
esxcli network firewall set –enabled false
The ESX firewall needs to be disabled temporarily to execute the tests – on client and server
go to the directory that holds the iperf3 command
cd /usr/lib/vmware/vsan/bin
execute the speed test against the server IP address
./iperf3 -c 10.0.0.1 -t 10 -V
this will start sending packets to the server – you will see the flow on both sides
cancelling this command – cntrl + c – can take a minute, be patient, especially if you mistyped the IP or forgot to disable the firewall etc..
Review the results on the speed test
Below are result samples for a 1 GB kernel network, a 10 GB kernel network and a 25 GB kernel network.
Sample results – 1 GB
Sample results – 10 GB
Sample results – 25 GB
Be aware, those results will vary and depend on the network bandwidth available in the moment of the test, respective the current load on the network cards of client and server.
IT-ESX-01P exit server mode and enable firewall
cntrl + c will exit the server mode and go back to the CLI
Windows Print Server Aliases – what is that and why would you even need to think about it?
For File-Servers, you can set up DFS structures and have a single point of entry as from the perspective of the client. It’s a simple named path and works rather flawless if set up right and monitored e.g. with PRTG. But what about your print server? Is it a defined hostname and the printers sit on this host? What happens when you want to upgrade the host to a new windows version or theoretically even do some special DNS routing (that’s very advanced and has hurdles, I will not address this in this posting).
Well – you can sure set up an ALIAS name in your DNS, but soon you will discover you can’t connect to the printers on this server. This is because you are missing some registry tweaks. At this point I also want to make you aware, I saw Windows updates removing those keys, so keep this article handy to reconstruct the registry in case of any issues.
You will need a total of three registry keys added, as follows:
This key, DisableStrictNameChecking, we need to configure the SMB server / LANManServer – he needs to be aware as well that we will use CNAMES to access the shares on the server. You can find some more information at the following link: Can’t access SMB file server – Windows Server | Microsoft Docs
And last but not least, the OptionalNames – this is the one key that’s most hidden but still so important. You can also make it REG_MULTI_SZ key. But it works with a simple REG_SZ key and the short CNAME alias that you have specified, you don’t even need use the FQDN.
There are many ways on how to accomplish this one last key, it changed throughout the Windows versions, it was possibly even renamed. Worst I saw on a Windows 2016 server was it vanished after a update session and reboot. So be prepared for that. A simple recreation and reboot fixed the issues.
Also, make sure you reboot after those changes, otherwise it won’t work.
It happens that some programs alert you in Windows 10 about Publisher: Unknown and expect you to possibly provide administrative credentials to even execute it.
Especially in corporate networks users likely don’t have this level of permissions and surely the IT department respective IT-Administrators going to be reluctant to grant administrative privileges when they are not absolutely necessary.
For this specific case, there is a possible workaround – try to start the program with the following CMD-command and see if you might be able to bypass this issue. I sure don’t recommend doing this just for any program, be sure that what you want to start is safe, but there are cases where this is necessary, cause you won’t want to alter the UAC (User Account Control) or permission level or the employee.
Having multiple applications that act as chat respective IM application but you want Microsoft TEAMS to be the default Instant Messenger application especially so Outlook e.g. shows the correct online/offline as well as free and busy status for employees and so they can start a conversation directly from there, you will need to make sure that Microsoft TEAMS is the default IM Provider.
This came up especially in combination with Cisco Jabber, that is often used as the software phone client for a Cisco phone system. This application might overrule the user settings and take presence especially in Microsoft Outlook. Cisco has an article about this here that talks about various registry keys. But this is actually not the direct solution for this issue.
In order to set TEAMS, if installed, the default application for your employees, it is easiest to engage Group Policies, GPOs, for this. Simply follow the below steps. Those settings will find out if Microsoft TEAMS is available and if so set it as default IM Provider. Close Microsoft Outlook and open it again and you will see the status icons and message box being associated with Microsoft TEAMS.
Of course, you could slightly adjust the suggested GPO settings and engage e.g. Cisco Jabber or any other IM provider available instead. Just have a look at the registry path HKEY_CURRENT_USER\Software\IM Providers and see what is available and set the GPO accordingly. All you need is the name of the sub key for the DefaultIMApp value.
Steps for the user GPO
Create a new GPO (or chose an existing GPO)
This will be a User Configuration
Navigate to User Configuration\Preferences\Windows Settings\Registry
Create a new Registry Item
Settings on General tab
Leave the Action settings to Update
Hive: HKEY_CURRENT_USER
Key Path: Software\IM Providers
Value name: DefaultIMApp
Value type: REG_SZ
Value data: Teams
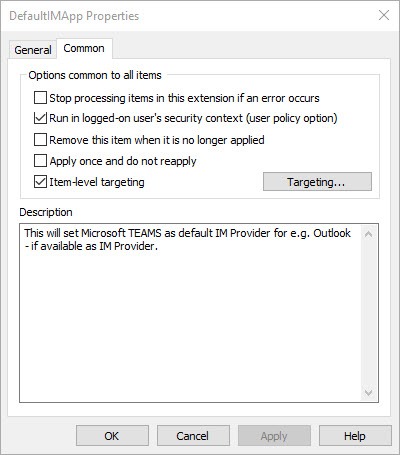
Settings on Common tab
Check Run in logged-on user’s security contact (user policy option)
Check Item-level targeting
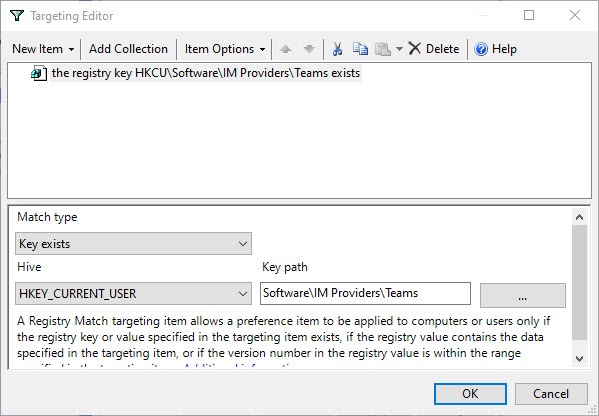
Click on Targeting and apply the following settings
The following steps make sure that this is only applied if Microsoft TEAMS is available as a IM provider
Click on New Item and chose Registry Match
Match type: Key exists
Hive: HKEY_CURRENT_USER
Key Path: Software\IM Providers\Teams
It is good practice to provide a Description for this item – e.g.: This will set Microsoft TEAMS as default IM Provider for e.g. Outlook – if available as IM Provider.
Make sure the GPO applies to your users and you should be all set. This will make sure that even if a new application is installed and takes the IM Provider role over, that your clients will still fall back to Microsoft TEAMS. Of course, it will depend on when the GPO was reapplied and that the user actually closes and reopens Outlook.
RemoteApp and Desktop Connections are quite powerful. Still, it happens that RDS icons configured through your Windows Remote Desktop Application broker either won’t update or vanish. This can have various reasons. Out of experience, the easiest way is to manually clean up and then configure the source again – as explained step by step below…
Delete the whole key WORKSPACES (just delete it! no worries)
In Windows Explorer
Navigate to:
%appdata%\Microsoft\Workspaces
Delete the whole WORKSPACES folder (yes – delete it!)
Navigate to:
%appdata%\Microsoft\Windows\Start Menu\Programs
If there is a folder “RDS Farm Name (RADC)” then delete it completely
(see footer note) Open Control Pannel
Navigate to “RemoteApp and Desktop Connections” or type in search box: remote
There should be nothing in the connections, add a new one while clicking on “Access RemoteApp and desktops” in the left hand menu
use your RDS URL
If asked for credentials, use the users credentials or have them type em in
This should finish successfully
You now should see the applications in the start menu again
Note: If you have a GPO or script configured to auto-configure the Control-Panel, you could just reboot as well instead of manually configuring the Control Panel again.
The Windows Search indexing is a solution from Microsoft that will index your file servers and their files full text and allow your end users to get results quickly while actually engaging the fulltext search database seamlessly.
This is accomplish by just using the search box in the upper right of the Windows Explorer while residing on a network share or mapped network drive.
Many people say that the Windows Search does not work right, but my experience is that quite the opposite is true and it only depends on the right set up. This I will explain here further.
Before we go in to details – there is a challenge that goes along withDFS namespaces. I found a way to bypass this, look here to understand how it works.
add an additional drive to your file servers
I roughly recommend about 10% of the total use size of your file shares that you want to index
you might be able to go with less or more – but expect 10% to be more on the safe side
give the new drive a drive-letter (e.g. I: for Index) and name it INDEX (to make clear that this is only to be used for the INDEX database)
add the following path to this drive
I:\ProgramData\Microsoft
The path above mirrors the default path on the C: drive where the index will reside by default, I recommend to mirror this path on the new target drive to keep things simple and clear
One challenge resides – if your indexing drive becomes full, Windows Search indexing will crash the index database and likely determine it as corrupt and start from scratch. This can happen within minutes, even before any of your monitoring solutions might warn you about the full drive. There are eventlog entries about and you would easily see that the number of indexed files dropped to a very low number again. The drive becomes suddenly pretty empty as well again. This is sure one of the downsides of how Microsoft implemented this, but if you provide plenty of space in the first place, you likely won’t experience this issue.
iFilters for PDF files seem not to be necessary on current Windows versions. In the past I downloaded a iFilter for PDF files from Adobe but I experienced many issues with temporary files on the C:\ of my file servers. This is a known bug with the Adobe iFilter – as for Windows 2016 those files are full text index, but the same restrictions as in the past apply – PDF file can hold editable text that can be indexed or they hold pictures – what is often due to scans of documents – as long your scanner didn’t due OCR and translate the image to text, those files can’t be full text indexed.
Monitoring
It is almost essential to have proper monitoring in place for this. Actually, you want to monitor everything within your network, but that’s another story. I faced the same challenges and even was able to find out more about how the index database grows and why many people aren’t happy with it. Eventually it comes down to improper configurations and bad or nor monitoring at all. I highly recommend you have a look at this additional blog article about Windows Index Monitoring.
Raspberry PI can read and write on a Microsoft SQL server database.
In order to accomplish this you follow the instructions here: http://pymssql.org/en/stable/index.html
To summarize it in a nutshell, here is what you need to do:
apt-get install freetds-dev
pip install pymssql
Update: Above information is for a Raspberry 2 – Raspberry 3 needs the below information as far as I know:
sudo apt-get install freetds-dev
sudo pip3 install cython
sudo pip3 install pymssql
Personally I had issues getting this to work in Python 3.x so I tested it in Python 2.x and it was working fine. The issue was simply that the module “pymssql” could not be found and therefor the IMPORT line already failed in the Python script. It should be a rather easy fix – like copying the files to the Python 3 modules folder, but as of now I did not have the time to investigate this further – as I was fine using Python 2 in my specific situation.
Here is a sample script
SQLServerConnectionPython.py
Python
1
2
3
4
5
6
7
8
9
10
11
12
13
14
importpymssql
server="mySQLservername"
user="myuser"
password="mypassword"
DB="mydatabase"
conn=pymssql.connect(server,user,password,DB)
cur=conn.cursor()
cur.execute('SELECT * FROM MyTable')
forrow incur:
#print(row['id'])
print(row[0])
conn.close
The example I tested used a SQL server user account. The documentation of PyMSSQL talks about the possibility to use Windows Authentication as well.
As for asking Google about this – there is a lot of confusion information out there – the top ranked posts aren’t really helpful, so I thought I just post it again hoping someone finds this helpful.
official maximum: 512 (decimal, NOT HEX!!!) (HEX: 0x200)
Now – we detected in January 2019 a bug that at least affects Windows 2016 servers, if not even more. We could not see the shadow copies of the current day. Any shadow copies of the previous day seemed to be fully available. The cut off was literally before midnight. After about 12 subsequent shadow copies they started to triple in.
Once we adjusted the maximum to 500 (decimal – HEX: 0x1f4) and restarting the service respective waiting till the next scheduled shadow copy executed (plus a few minutes to process a cleanup) we eventually could see the most current shadow copy from the Windows Explorer menu.
This seems to work way better then the 512 that is the defined maximum. There seems to be some kind of a bug that started with some update. We couldn’t determine it in detail and simulating this would take a lot of time.
This is a GUI based tool that partly lets you look in to your shadow copies. Only, if you try to open the most current paths while the 512 maximum was set, Windows Explorer still couldn’t handle it. But it was a nice detailed proof to see that the current shadow copies where as a matter of fact there.
Similar results could be determined while using PowerShell and command line commands like VSSadmin – we saw the shadow copies where there.
this is all a calculation, straight hourly provides you 500 copies / 24 hours a day = +/- 20 days back
if you go e.g. 5 AM to 9 PM and no Sundays you extend this: 500 / 17 snaps a day (hourly) = +/- 29 days => add the removed Sundays in the equation and you easily bypass a whole month
this would allow you while doing full virtual machine backups (VHD level backups) to keep the month end tape of every month and still be able to restore files from the shadow copies in theory – I had cases where I had to dig that deep..
volume configuration on your file servers (the drive letters don’t matter much)
C: System – Windows OS etc.
D: Data – this is where your shares resides – preferred DFS as described here
E: Shadow Copies
configure the shadow copies to be saved on their own volume / vhd / so they don’t take away space and you gain more control over how much space they actually can take
configure them so they can use 100% of this separate volume
do not use the volume for anything else (of course)
APC network cards – or the NIC of many APC devices like UPS and A/C – possibly even NetBotz (APC – aka. Schneider Eletric) tend to have an issue that the system is telling you in the browser that there is already a session active.
The reason is that they tend to keep the session online forever, if you don’t click on logoff before you close your browser etc.
What you will see is an error like this after you entered your valid credentials:
Notice
Someone is currently logged into the APC Management Web Server.
Please try again late
It is actually pretty easy to bypass this – you either use TELNET or SSH to logon to the system with the same credentials and then simply logout there.
While doing so – you logoff the user and you will be able to logon again.
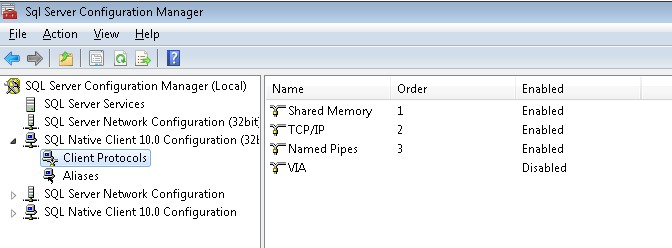
One of the challenges especially with SQL Express is that you need to enable some protocols on the network level first in order to connect to it. You might see an error message the one below when you try to connect to SQL – stating SQLState 08001 and Error 17.
In order to resolve this, you need to enable named pipes and TCP in the SQL Server Configuration Manager that was installed by default on your system. See the image below on how it should look like. Please note that you need to restart the SQL service in order for those changes to take effect.
Please note – there might be a need of additional configuration like the Windows Firewall or other parameters, the above just addresses a rather common issue.
An issue or question I see again and again – proper RADIUS logging with Microsoft NPS / Network Policy Server.
Let’s guide you through a few steps
Install a Microsoft SQL or if not available SQL Express
be aware – SQL Express has very tight database size limits and no SQL Agent – this might be an issue
Create a new database via SQL Management Studio in the SQL server
name it e.g. RADIUSLogging
run the SQL script from this Microsoft website in a new query window against this database (make sure it is not run against any other database by accident)
you could add a line like USE RADIUSLogging to prevent this – in the very top…
configure your RADIUS server to log to this SQL server and database
make sure you have fail-over logging to a text-file – to avoid issues in case your SQL DB grew to big or was not reachable for any reason
decide in the text-file configuration if you want to deny access if there is an issue or if you still want to proceed with the logon
Now you have RADIUS logging the information to a SQL database – actually a single table – and you can dig around in it. The IT-Assets database provides a front-end example for this – you don’t need to use it – but it might be of help – see here.
To interpret all those columns and values – look at the following links for additional information:
You will face the issue that the database will grow rapidly – depending on how many requests go to your RADIUS system etc… Keep an close eye on it – use a monitoring software like Paessler / PRTG to monitor the size and keep in mind that SQL Express might have size limits like 10 GB. The full version of Microsoft SQL has no such limits and further can you use SQL Agent to execute tasks. The following script can help you purging data from the RADIUS database to keep its size under control. You can use SQL Agent (not in SQL Express) to run it automatically or if you use SQL Express either run it manually or with another solution somehow automatically against the database delete older entries.
The script actually will purge data older then 14 days – you can adjust the days to your liking / needs.
Today we look at independent backup networks especially in regards to LTO 7 and VMware ESX hosts. Be aware – this very example also applies to any backup to disk (B2D / Backup-2-Disk) solution. But a good reseller / vendor would inform you about this right away anyways.
LTO 7 and later like LTO 8 drives have a write speed faster then a 1 GBit network can handle, making it now really necessary to think about options. On top of it, you do not want to over utilize the LAN side of your servers so that the impact on the user / application facing side stays minimal. This leaves you with two options, you can group switch ports assuming you have enough 1 GB ports and use them, you will need at least 3 ports combined, or you create a whole backup network on a 10 GB basis.
Let’s run some numbers:
LTO7 has a write speed of about 300 MB/s uncrompressed and up to 750 MB/s compressed
LTO8 (L8) has a write speed of about 360 MB/s uncrompressed and up to 900 MB/s compressed
Now – your network connection is meassured in MBit/s not MByte/s. Byte to bit is 8 bit are one byte, so we need to multiply those speeds in byte with 8 bit too see the network speed numbers.
LTO7 uncrompressed = 300MB/s * 8 = 2400 MBit/s
LTO7 compressed = 750MB/s * 8 = 6000 MBit/s
LTO8 uncrompressed = 360MB/s * 8 = 2880 MBit/s
LTO8 compressed = 900MB/s * 8 = 7200 MBit/s
Assuming you want to go with grouped ports, you see that with LTO7 you would need 6 ports and LTO8 7 to 8 ports to fully utilize the speed and minimize your backup window. Additionally think about the read speed that might affect you as well – not just for recovery but for the verify of your backup.
Now – this means – add at least one 10 GB switch and one 10 GB NIC to each server – let’s do this with an example:
3x VMware ESX hosts – LAN side and management is configured 1 GB – we assume there is some kind of storage behind them that has the iOPS and speed we need like an SSD based storage
1x Backup media server that has an LTO7 or LTO8 drive connected – 1 GB on the LAN side
What we need – minimal:
4x 10 GB NICs
1x 10 GB switch
4x CAT6e or CAT7 cables
What I would recommend – nice to have:
4x 10 GB NICs – dual port
2x 10 GB switches
10x CAT7 cables – 2x to stack/trunk the switches if not stacked otherwise
This is a nice to have – a fail-over, but the minimal configuration is sufficient as well.
Cable this all in – create a new IP-scope / VLAN on the backup side – you do not need any default Gateway etc. on the Backup-Network side (10 GB). Just an independent IP scope and have every host assigned a static address.
This keeps the regular network traffic and any broadcasts away from this network and your backup will run totally independent. You might need to disable your anti-virus solution on this NIC / IP-scope on the backup media server as well, cause it might actually influence the speed quite drastically. Having it separated and independent helps keeping the security up.
On the VMware hosts – I like to even allow VMware to vMotion on this backup-LAN – simply because it is extremely efficient there – independent from your LAN and if you have it from your iSCSI network as well. But that’s just an idea.
Now – the backup – how will it grab the data from the 10 GB side of your VMware hosts – especially if you have a vSphere cluster and grab the backup through the cluster?
Simple – you adjust the hosts file on your media server. Each and every VMware host needs to be listed in the hosts-file on the media server with the IP that it has in your 10 GB backup network. This way DNS and everything will act normal in your environment, only the backup-media server will reach out to those hosts on the 10 GB network due to the IP resolution of those hosts. This is the easiest way to accomplish this.
You will not to add a 10 GB connection, backup-network IP address etc. to your VMware vSphere controller – it can stay on your LAN or server-management network as is. This also means there is no reason to mention him in the hosts file on the media server.
How this works: your backup will contact the vSphere controller on the LAN side it will then be redirected to the host that currently holds the VM you want to backup the media server now will contact the VMware host directly – due to the hosts-file entry on the 10 GB backup-network backup will process…
This of course would work with a physical server as well – like a physical file-server etc. – though, today this is rather rare and especially VMware backups are actually large files that benefit most from the LTO7 write speed so the above makes sense there most. It wouldn’t matter if you do the same to an Hyper-V environment or any other VM host/guest solution. In theory it should always work the same.
What real world write speeds can you expect? This is the big question – here are some real world examples of this – those are single jobs on per VM basis, meaning it includes even the tape-load and tape-unload processing time and udpating the catalogs while using Veritas Backup Exec.
Backup size (VM size)
elapsed time in minutes
job rate write/overall
job rate verify
4 TB
6:47
17,227 MB/min
26,404 MB/min
2 TB
6:47
6,822 MB/min
22,233 MB/min
1.21 TB
3:49
8,271 MB/min
20,235 MB/min
147 GB
0:33
6,491 MB/min
22,655 MB/min
138 GB
0:17
18,403 MB/min
27,726 MB/min
25 GB
0:10
9,172 MB/min
20,700 MB/min
The above list is just an example – realistically we see speeds between about 3,000 MB/min to 18,000 MB/min as for the overall speed. This is due to the VM itself for some part – thin or thick provisioned, what kind of data is it holding, how busy is the host cause we might double trouble him due to multiple drives doing backups at the same time to the same host etc… In average we see around 8,000 to 9,000 MB/min in speed, what is still great – and I wanted to show as well that it can vary quite a bit so don’t be scared. We still did improve the time the backup took from going from an LTO4 LAN based backup scenario to an LTO7 independent backup network while cutting the time in half, actually, even less then half. The slowest speeds we see today are due to systems that can only be backed up on the LAN side, while the ports are grouped there but we still don’t have the same speed as we see on the backup-network side. Many factors come in play but that all depends on the individual situation.
Hoping the information above helps some of you out there – keep in mind that your situation might be different, run some examples and ideas and if you have questions, reach out – this remains an example of what I really implemented at a company and how it affected the backup configuration and management.
If you try to PXE boot a VMware guest system that e.g. uses WDS / Windows Deployment Services or similar, you might encounter that the boot.wim etc. download unbelievable slow. This can take several hours. This has especially to do with booting via the VMware EFI environment. VMware BIOS does not cause this issue. You could switch a EFI system to BIOS to capture/deploy the image – but this is not really a solution rather then bypassing it.
The solution for this is pretty simple, while the download is transferred through a TFTP, VMware has an issue with the blocksize and this gets a bit messed up due to the variable blocksize between the VM guest system and your PXE server.
Set the Maximum Block Size to 1456 – what is the exact value VMware needs to work properly. Disable further the Variable Window Extension and try to PXE boot again – you will see it will load in about a minute now – depending on your WinPE image size and your issues are in the past.
In detail:
open your Windows Deployment Services
right click on the server and select Properties
navigate to the register card TFTP
set the Maximum Block Size to 1456
uncheck the Enable Variable Window Extension checkbox
To provide the best experiences, we use technologies like cookies to store and/or access device information. Consenting to these technologies will allow us to process data such as browsing behavior or unique IDs on this site. Not consenting or withdrawing consent, may adversely affect certain features and functions.
Functional Always active
The technical storage or access is strictly necessary for the legitimate purpose of enabling the use of a specific service explicitly requested by the subscriber or user, or for the sole purpose of carrying out the transmission of a communication over an electronic communications network.
Preferences
The technical storage or access is necessary for the legitimate purpose of storing preferences that are not requested by the subscriber or user.
Statistics
The technical storage or access that is used exclusively for statistical purposes.The technical storage or access that is used exclusively for anonymous statistical purposes. Without a subpoena, voluntary compliance on the part of your Internet Service Provider, or additional records from a third party, information stored or retrieved for this purpose alone cannot usually be used to identify you.
Marketing
The technical storage or access is required to create user profiles to send advertising, or to track the user on a website or across several websites for similar marketing purposes.