
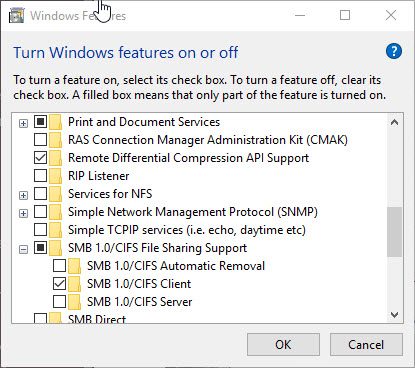
 SMBv1 is an insecure protocol that you should not use if by any means possible. Windows 10 has SMBv1 disabled by default. In order to enable it you would need to go to the Control Panel and activate the Windows Feature “SMB 1.0/CIFS File Sharing Support” and at a bare minim the “SMB 1.0/CIFS Client“. You actually might just want to do that cause you really shouldn’t add more SMBv1 servers to your network.
Before you proceed reading – if you really need to enable this protocol – please make sure your systems are all patched! Especially your target servers should be patched as well – assuming they are Windows XP / 2003 / Vista / 2008 / 7 / 2008 R2 / 8 / 8.1 / 2012 / 2012 R2 / 2016 and 10. I highly recommend to look at this Microsoft link: https://docs.microsoft.com/en-us/security-updates/securitybulletins/2017/ms17-010. Additionally do I want to mention that Windows XP and Windows 2003 can be patched as well – though they are not on the list of the previous link. Look at Microsoft KB4012598 for more information or use this download link https://www.microsoft.com/en-us/download/details.aspx?id=55245. I can not warn enough about SMBv1 – you open the doors for malware here that can bring down your network in minutes and cause huge damage!
Please note – I did not research in detail if other previous Windows versions did disabled SMBv1 already by default, this article might in any case apply to Windows 7, 8 and 8.1 as well and be applicable to Windows 2008, 2008 R2, 2012, 2012 R2 and 2016 as well as newer Windows versions to come.
 Now, the issue with Windows 10 and SMBv1 disabled is that often old legacy Windows 2003 servers are around that can’t just be upgraded or replaced. In order to access any file share you would need to enable SMBv1 on the client workstations. This could sure be done by preparing your installation image etc. – but if you did not plan for this or want to have more granular control, you might consider using Group Policies / GPO to enabled this Windows Feature.
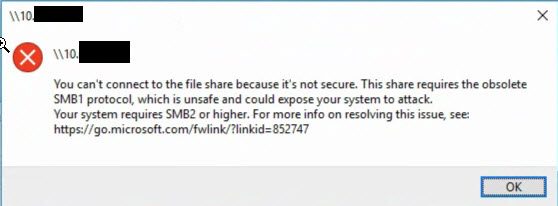
It is further worth noting that the easiest way to find the issue is not trying to access the UNC share via the server-name rather then directly typing in the IP address in your attempt. This way you actually get a way clearer error-message from Windows. I mention this, to show you and explain that there actually is a difference between trying to access a server-name and an IP address per UNC path – especially when it comes down to Windows 10 and the error messages you might see.
Officially enabling a Windows Feature is not supported per GPOs nor is there much information out there on how to enable SMBv1 per GPO. Having faced this challenge recently, I found a good working way that is pretty easy to implement.
- enable the feature on 1x Windows 10 client
- export / document the registry key HKEY_LOCAL_MACHINE\SYSTEM\CurrentControlSet\Services\mrxsmb10
- copy the file %windir%\system32\drivers\mrxsmb10.sys
- create a GPO
- put the mrxsmb10.sys in the GPO or a central accessible file (the target computer account must be able to read the file! – I often put it in either NETLOGON or directly in the GPO / scripts folder)
- Computer Configuration \ Preferences \ Windows Settings \ Files
- create a new entry to copy the file to the target system
- Source file: where you centrally placed the mrxsmb10.sys
- Destination file: %windir%\system32\drivers\mrxsmb10.sys
- Computer Configuration \ Preferences \ Windows Settings \ Registry
- Create or import all the registry keys from HKEY_LOCAL_MACHINE\SYSTEM\CurrentControlSet\Services\mrxsmb10
A registry hive export would look like this:
1 2 3 4 5 6 7 8 9 10 11 12 13 14 | Windows Registry Editor Version 5.00 [HKEY_LOCAL_MACHINE\SYSTEM\CurrentControlSet\Services\mrxsmb10] "DisplayName"="@%systemroot%\\system32\\wkssvc.dll,-1004" "ErrorControl"=dword:00000001 "Group"="Network" "ImagePath"=hex(2):73,00,79,00,73,00,74,00,65,00,6d,00,33,00,32,00,5c,00,44,00,\ 52,00,49,00,56,00,45,00,52,00,53,00,5c,00,6d,00,72,00,78,00,73,00,6d,00,62,\ 00,31,00,30,00,2e,00,73,00,79,00,73,00,00,00 "Start"=dword:00000002 "Tag"=dword:00000006 "Type"=dword:00000002 "Description"="@%systemroot%\\system32\\wkssvc.dll,-1005" "DependOnService"=hex(7):6d,00,72,00,78,00,73,00,6d,00,62,00,00,00,00,00 |
Apply the GPO to your target systems / workstations and reboot them – after that you will be able to access the necessary shares. The downside is – you don’t really see the feature as enabled in the Windows-Features. It will work nevertheless.