 Employees are the actual user base. It is highly recommended to use the LDAP synchronization for this, as the users are automatically read and updated from the information stored in Active Directory.
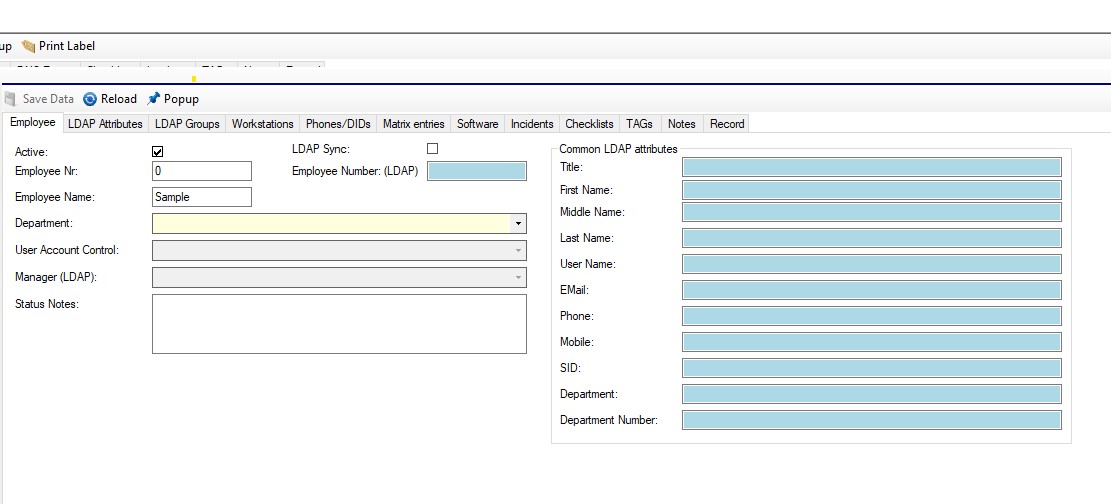
Most fields in the employee’s module are write protected, as the information for those fields are read from Active Directory only. The department should be set manually or per checklist, as this is re-used in modules like purchasing.
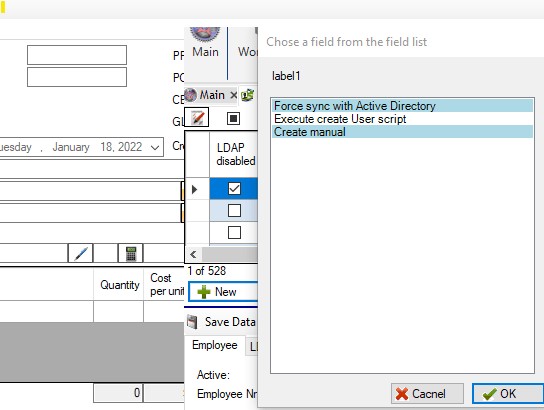 The new button gives you a choice of options, depending on the system configuration in settings, so that you can create new employees in Active Directory via a PowerShell script (see sample below), force Active Directory synchronization now or add manual employee entries compensate for some special purposes. In general LDAP synchronization is highly recommended instead of manual entries.
The list allows you to actually see if the entry comes from LDAP or if it was manually created using the synchronized / Sync column. If it was synchronized, you further have a LDAP last seen column that indicates if the user was actually deleted in your Active Directory.
Even further is there a column # Wkst. that will show you how many workstations are assigned to the employee.
All of this information is useful to filter e.g. for all deleted users that have one or more workstation assigned, to accomplish this do the following:
- LDAP last seen = >=7/18/2018
- # Wkst. = >0
Setting those two filters would show you all deleted user accounts that still have workstations assigned.
Data field and reference overview
Most of the fields here aren’t editable because they are synchronized from Active Directory.
- Active (editable)
- LDAP Sync – see settings
- Employee Nr. (editable) – in the database
- Employee Number LDAP (synchronized)
- Employee Name (editable)
- Department (editable)
- User Account Control / UAC – current LDAP status of the user object
- Manager (LDAP)
- Status Notes (editable)
- Common LDAP attributes – all read only
- Title
- First Name
- Middle Name
- Last Name
- User Name
- Phone
- Mobile
- SID
- Department
- Department Number
- LDAP Attributes – all read only
- Description
- Info
- Display Name
- WWW Home Page
- User Principal Name / UPN
- Department
- Department Number
- Company
- Distinguished Name / DN
- Physical Delivery Office Name
- Street Address
- Post Office Box
- City
- State
- Postal Code
- Country
- Country Code
- Manager
- Pager
- Facsimile Telephone Number
- IP Phone
- Primary Group
- Profile Path
- Script Path
- Home Drive
- Home Directory
- Home Phone
- When Created
- User Account Control (raw value)
- Proxy Addresses
- Removed Date (this shows when the account was last seen by the LDAP synchronization)
- Account Expires
- Disabled
- LDAP Groups – this is read only – you can see what LDAP groups the user is currently in
- Workstations – current and previously assigned Workstations
- Phones / DIDs assigned in the database
- Responsibility Matrix entries related to this employee / user account
- Software references
- Incidents
- Checklists
- TAGs
- Notes
- Created on and by
- Last edited on and by
- Record history
Example Script for adding new employees in LDAP
This PowerShell script can be executed directly from the employee’s module via the new button, you need to define it in the application settings.
This sample script is already rather complex and walks you through various options in order to create a new Active Directory user account. It eventually depends on your configuration and needs and remains an example only. You need adjustment it to your specific needs, besides the mandatory OU and Domain values that can be configured in the header section of the script.
1 2 3 4 5 6 7 8 9 10 11 12 13 14 15 16 17 18 19 20 21 22 23 24 25 26 27 28 29 30 31 32 33 34 35 36 37 38 39 40 41 42 43 44 45 46 47 48 49 50 51 52 53 54 55 56 57 58 59 60 61 62 63 64 65 66 67 68 69 70 71 72 73 74 75 76 77 78 79 80 81 82 83 84 85 86 87 88 89 90 91 92 93 94 95 96 97 98 99 100 101 102 103 104 105 106 107 108 109 110 111 112 113 114 115 116 117 118 119 120 121 122 123 124 125 126 127 128 129 130 131 132 133 134 135 136 137 138 139 140 141 142 143 144 145 146 147 148 149 150 151 152 153 154 | Import-Module ActiveDirectory $DomainController = "" #leave empty if any $UPNDomain = "@domain.local" #include the @ if you use this option $DefaultPassword = "Abcd123!" $ChangePasswordAtFirstLogon = $false #$false or $true $UserIsEnabled = $true #$false or $true $PasswordNeverExpires = $false #$false or $true - this is the default - Service Accounts are handled differently $OUUsers = "OU=Users,OU=Company,DC=domain,DC=local" $OUAdmins = "OU=Admins,OU=Company,DC=domain,DC=local" $OUServices = "OU=Service Accounts,OU=Company,DC=domain,DC=local" $ErrorColor = "Red" $WarningColor = "Yellow" Write-Host "" Write-Host "" Write-Host "New User Script" Write-Host "===============" Write-Host "" $UserName = (Read-Host -Prompt "Please enter desired UserName") $FirstName = (Read-Host -Prompt "Please enter desired FirstName") $LastName = (Read-Host -Prompt "Please enter desired LastName") $Password = (Read-Host -Prompt "Please enter desired Password (obey length and complexity rules) [$DefaultPassword]") Write-Host "" Write-Host "" If ($UserName.Trim().Length -eq 0) { Write-Host "UserName invalid, exiting script..." -ForegroundColor $ErrorColor Pause Exit } Else { $ADUser = "" Try{ If ($DomainController.Length -gt 0) { $ADUser = Get-ADUser -Identity "$UserName" -Server "$DomainController" -ErrorAction SilentlyContinue } Else { $ADUser = Get-ADUser -Identity "$UserName" -ErrorAction SilentlyContinue } } Catch {} If ($ADUser.SID.Value.Length -gt 0) { Write-Host "" Write-Host "" $ADUser Write-Host "" Write-Host "" Write-Host "UserName exists already, exiting script..." -ForegroundColor $ErrorColor Pause Exit } } If ($FirstName.Trim().Length -eq 0) { Write-Host "FirstName invalid, exiting script..." -ForegroundColor $ErrorColor Pause Exit } If ($LastName.Trim().Length -eq 0) { $LastName = (Read-Host -Prompt "LastName was empty - please confirm or enter a valid LastName") } If ($Password.Trim().Length -eq 0) { Write-Host "Using default password: $DefaultPassword" -ForegroundColor $WarningColor Write-Host "" Write-Host "" $Password = ConvertTo-SecureString "$DefaultPassword" -AsPlainText -force } Else { $Password = ConvertTo-SecureString "$Password" -AsPlainText -force } Write-Host "" Write-Host "" Write-Host "Please choose from the following options:" Write-Host "=========================================" Write-Host "1 `t Regular user / employee" Write-Host "2 `t Administrative account" Write-Host "3 `t Service account" Write-Host "" Write-Host "" $Option = (Read-Host -Prompt "Please enter the number of the desired option [1]") If ($Option.Trim().Length -eq 0) { $Option = 1; } $TargetOU = ""; Switch ($Option){ "1" { $TargetOU = $OUUsers; break; } "2" { $TargetOU = $OUAdmins; break; } "3" { $TargetOU = $OUServices; $PasswordExpiresAnswer = (Read-Host "Should this password NEVER EXPIRE [y]?") If ($PasswordExpiresAnswer.Length -eq 0){ $PasswordNeverExpires = $true } ElseIf ($PasswordExpiresAnswer.ToLower().Trim() -eq "y") { $PasswordNeverExpires = $true } ElseIf ($PasswordExpiresAnswer.ToLower().Trim() -eq "yes") { $PasswordNeverExpires = $true } Else { $PasswordNeverExpires = $false Write-Host "" Write-Host "" Write-Host "The password will be set to expire..." -ForegroundColor $WarningColor Write-Host "" Write-Host "" pause } break; } default { Write-Host "Option invalid, exiting script..." -ForegroundColor $ErrorColor Pause Exit break; } } Write-Host "" Write-Host "" Write-Host "Attempting to create the new user account..." Write-Host "" Write-Host "" Try { If ($DomainController.Length -gt 0) { New-ADUser -Server "$DomainController" -PasswordNeverExpires $PasswordNeverExpires -Name "$FirstName $LastName" -GivenName "$FirstName" -Surname "$LastName" -SamAccountName "$UserName" -UserPrincipalName "$UserName$UPNDomain" -Path "$TargetOU" -Enabled $UserIsEnabled -ChangePasswordAtLogon $ChangePasswordAtFirstLogon -AccountPassword $Password } Else { New-ADUser -PasswordNeverExpires $PasswordNeverExpires -Name "$FirstName $LastName" -GivenName "$FirstName" -Surname "$LastName" -SamAccountName "$UserName" -UserPrincipalName "$UserName$UPNDomain" -Path "$TargetOU" -Enabled $UserIsEnabled -ChangePasswordAtLogon $ChangePasswordAtFirstLogon -AccountPassword $Password } Write-Host "" Write-Host "" Write-Host "The new user was created successfully..." If ($DomainController.Length -gt 0) { Get-AdUser -Identity $UserName -Server $DomainController } Else { Get-AdUser -Identity $UserName } } Catch { $_.Exception.Message Write-Host "" Write-Host "" Write-Host "An error occurred while attempting to create the new user. Please see above Error-Message for details. Exiting script." -ForegroundColor $ErrorColor Pause Exit } Write-Host "" Write-Host "" Write-Host "Script finished..." Pause |